
-
Congrats on the maiden Jim. Pretty soon Bidules are going to outnumber the Blaniks and ASW20's.... -
I need to design brakes for Scott aka Stew2 for his trailer so it won't roll down the hill at Cumberland Lol! In the mean time a wheel chock should do. ;-)
Pete, the only way to find out is to send me first some detailed pictures of the gear with the wheel removed and inside of the wheel. Then if it looks do-able, then you would have to send me the complete undercarriage.Leave a comment:
-
Looks great! I wish I could adapt Gunny's brakes to fit on my Carbon Cub
PeteLeave a comment:
-
I should be maidening mine in April, putting 4 Bidules in rotation for towing, and with a few more tow planes showing up, we should be able to all tow for not much more than a tank's worth of time through a day!! That should help greatly with the longevity of equipment and allow for lots of glider time as well. All a win-win situation. Glad to hear all went well and the 150 is a good match for the airframe, it gives yet another option for power, and that is a good thing! Also glad to hear your steering system is working well. Kudos to Gunny for the superb brake design, never had a doubt that wouldn't work well though.Leave a comment:
-
Congratulations on the maiden.........your build is great Jim !
Sounds like the new brake system is a real winner as well..........very nice engineering on that. I know what I will be adding to my Bidule this season
Leave a comment:
-
The plane was pretty much flawless on its maiden flight today. Kudos to Jim for doing such a nice job getting it ready.
Smooth, strong and plenty of power.
Leave a comment:
-
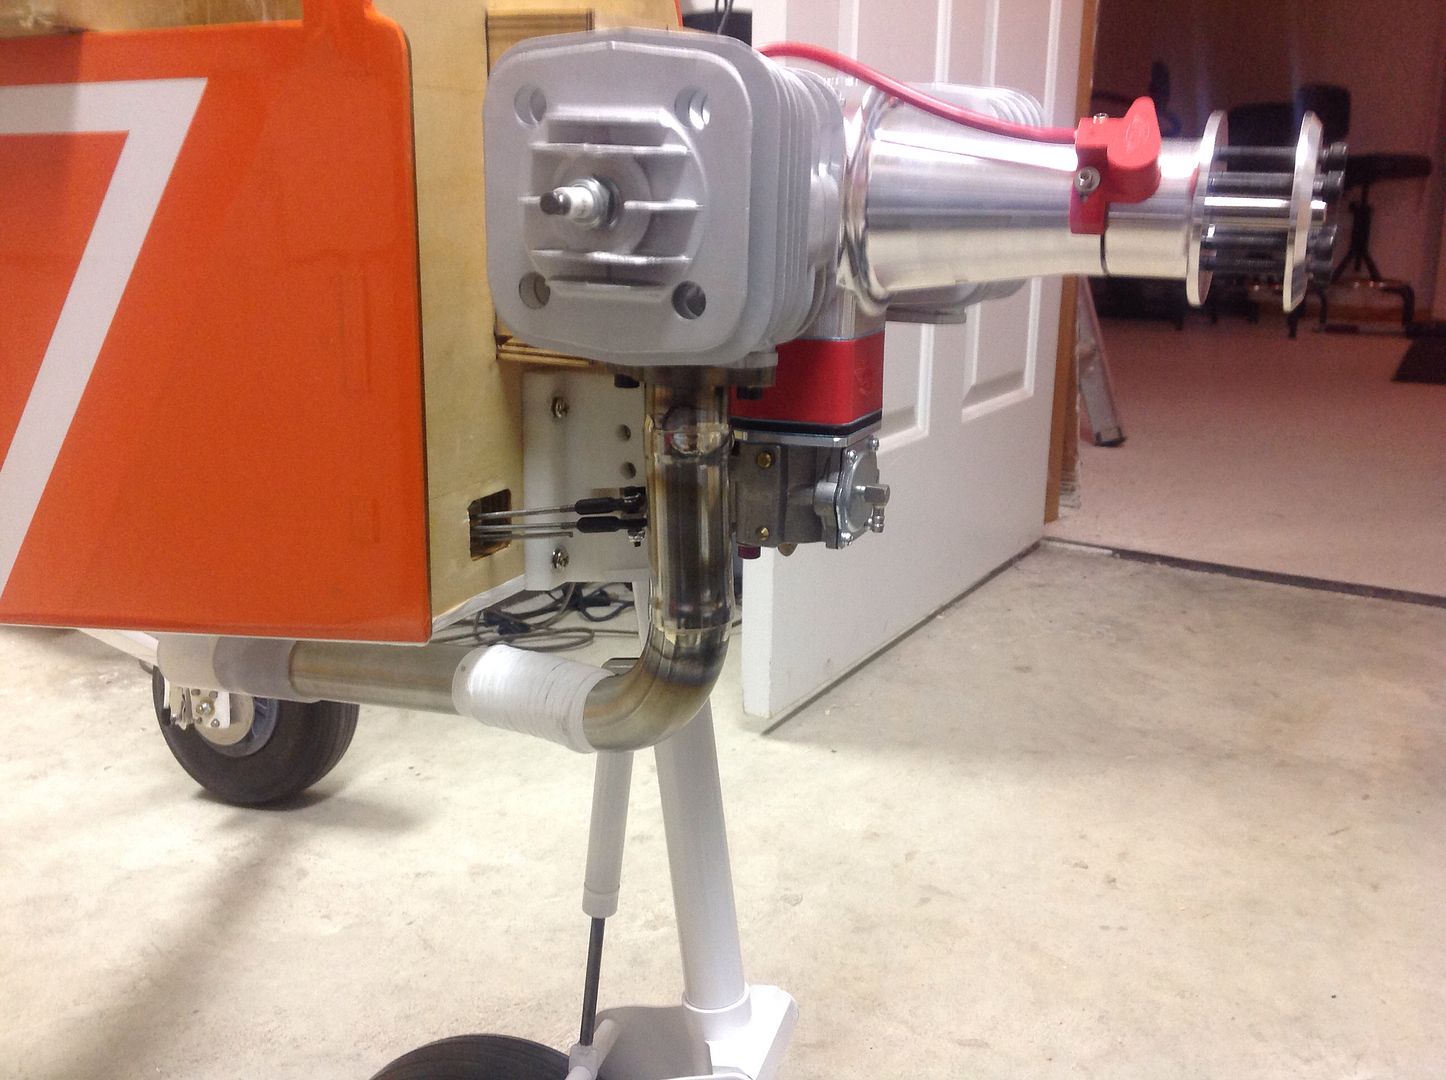
We finished the headers and canister mount on Monday and cut and fitted the cowling yesterday. The fuel tank was the last item on the list and we literally finished it at the field ten minutes before the first flight.
Test fitting the second header pipe...
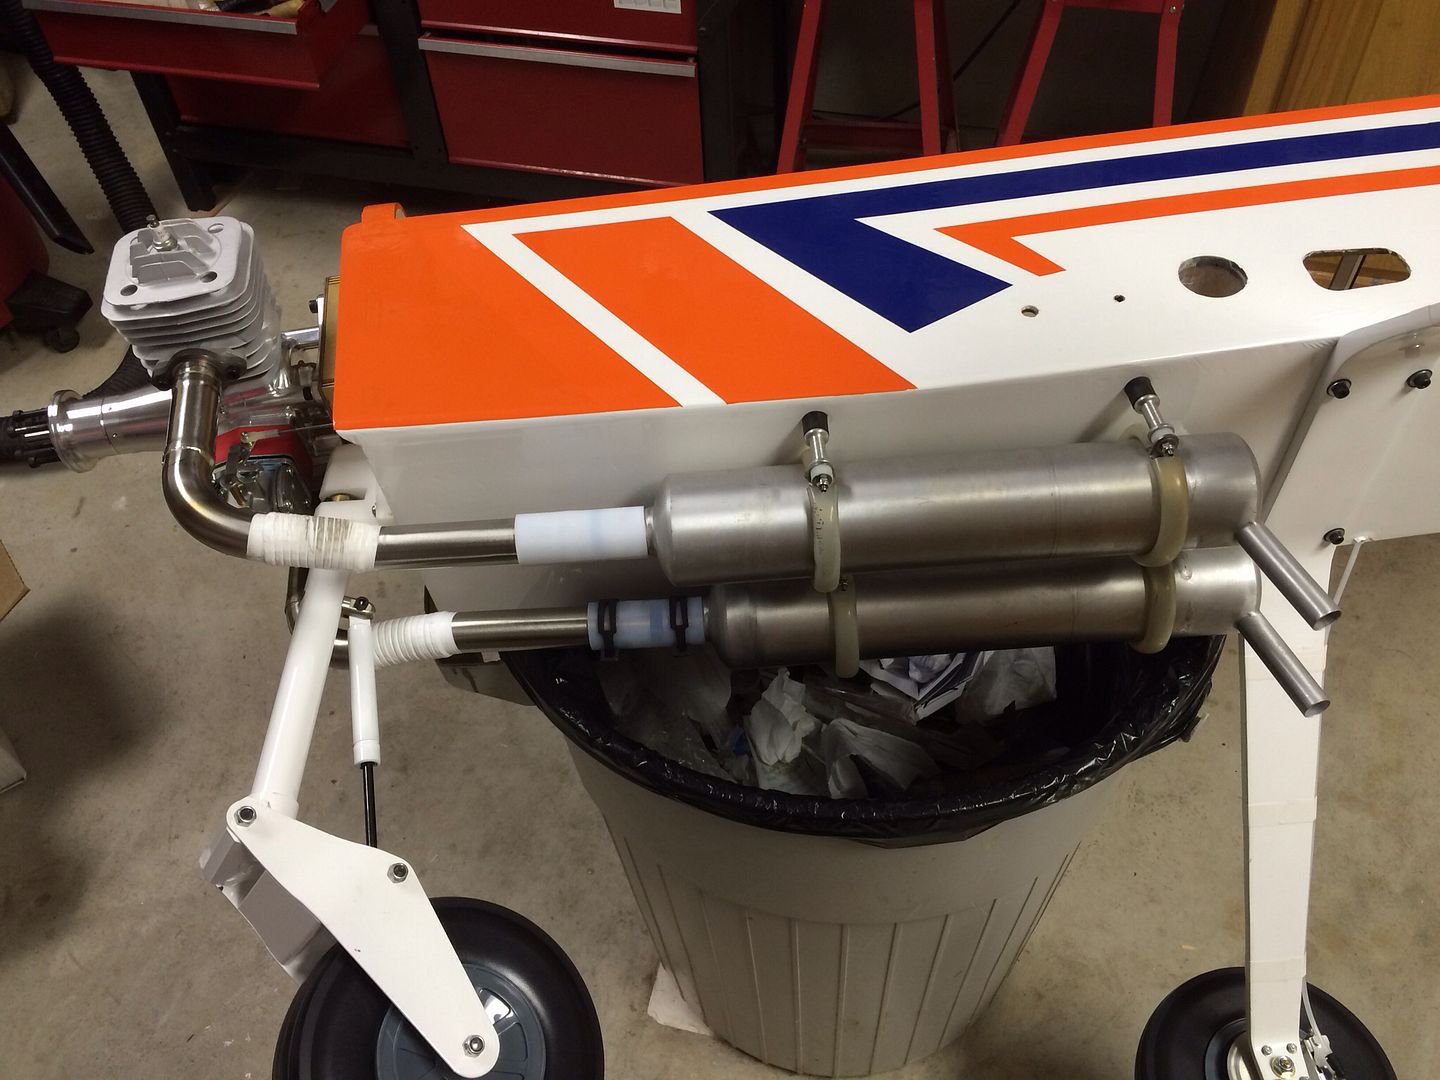
First flight...

There are numerous things to report:
* first, the hydraulic brakes worked perfectly. They will keep the plane from moving at fast idle and slow it down and stop it on a long landing.
* second, the nose spring steering damper worked well also. Was able to steer and make tight turns but still has enough give to keep from beating up the servo.
* third, the DA-150 has plenty of power. We did a few tweaks and the engine ran strong at the top end and with a good slow idle on the bottom end.Leave a comment:
-
I don't think it is a twisting motion that fatigues the tiller arm as much as it is vertical force components that will bend the arm back in forth resulting in a fatigue crack at the thinnest ligaments across the lower screw hole. Your design should allow the best alignment to minimize or eliminate the vertical movement. Time will tell. I could also be that the material that the stock arm is made of is such crap that it is un-fixable with that piece. Bob, Len and I went with the grunt solution of throwing more section and better material at it. Will you be running 7.4V at the steering servo? I ask only because I am curious as to how much torque your system will be running with. Always great to see, learn and think from different designs and solutions. Your design would be much easier to fabricate than the Losi servo saver adaptation. The servo access and serviceability is much better.Leave a comment:
-
One of the biggest challenges of the Bidule 170 is how to control the steering function of its giant nose gear. Back when I first got my Bidule 170, Len and Scott had not yet found the steering servo saver that has proven to be an excellent fix. The off the shelf parts make their fix particularly impressive.
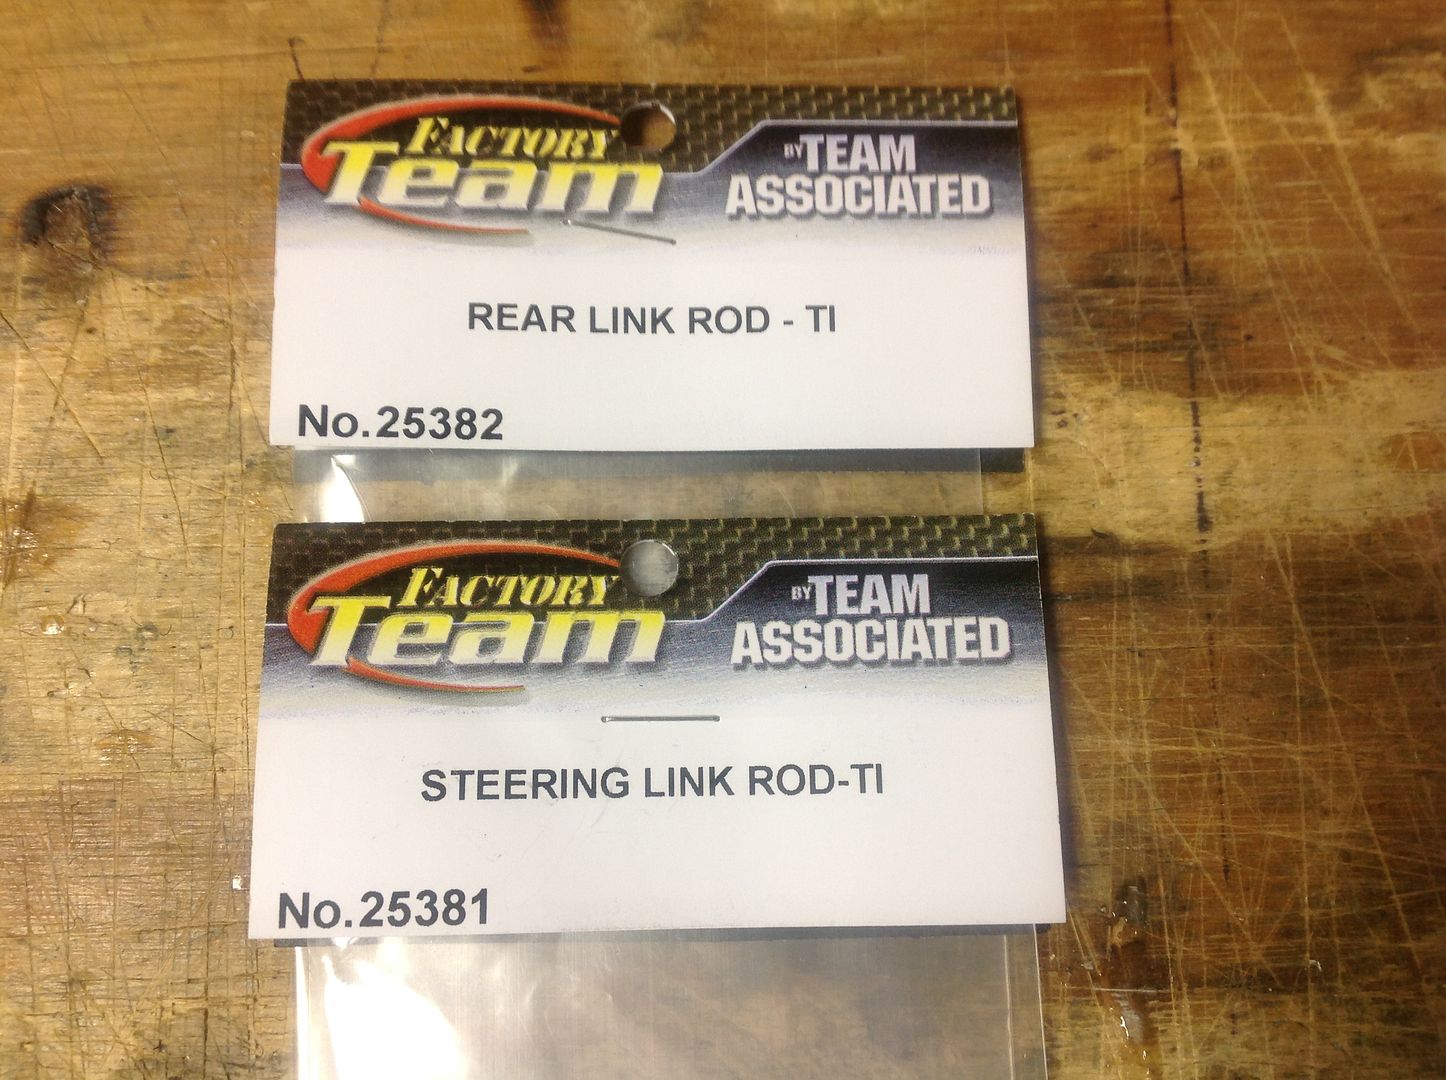
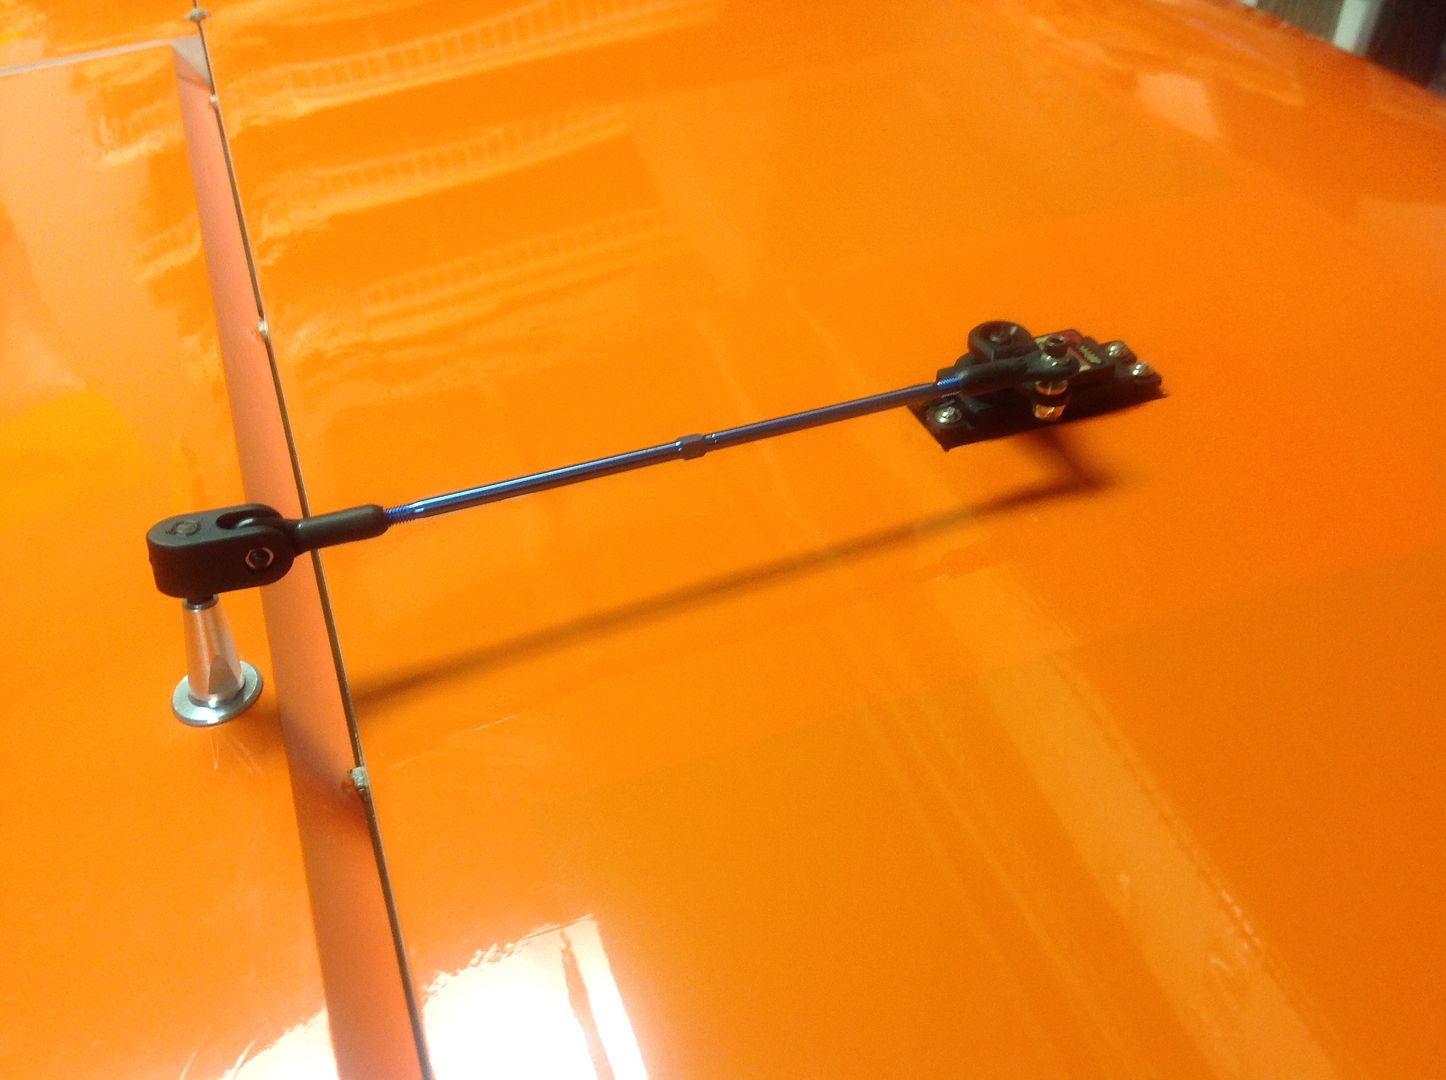
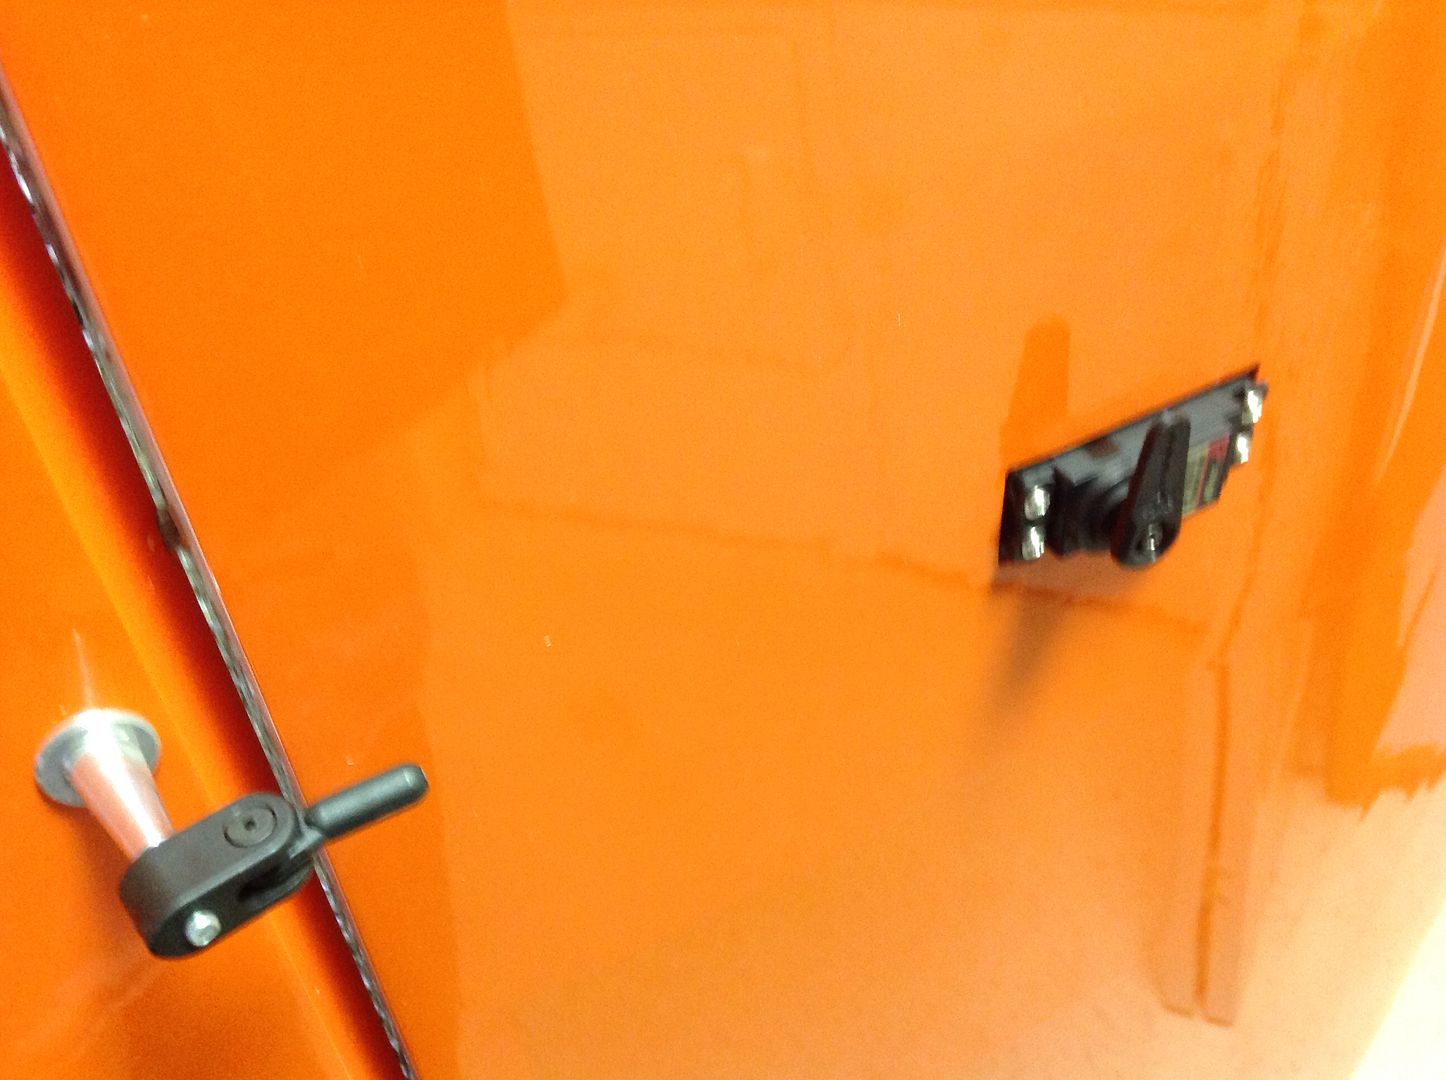
I set out to invent a servo saver mechanism and had Gunny custom cut some parts for me and now it is time to try them out. Even with Len and Scott's setup, the pushrod attachment to the tiller arm exerts a twisting motion on the arm and makes it prone to breaking. Their fix is to make a thicker steel tiller arm. Part of my setup is to solve this issue by using a double ball link "fork" for this attachment. Hopefully, this will avoid the twisting stress.
Well, here it is:
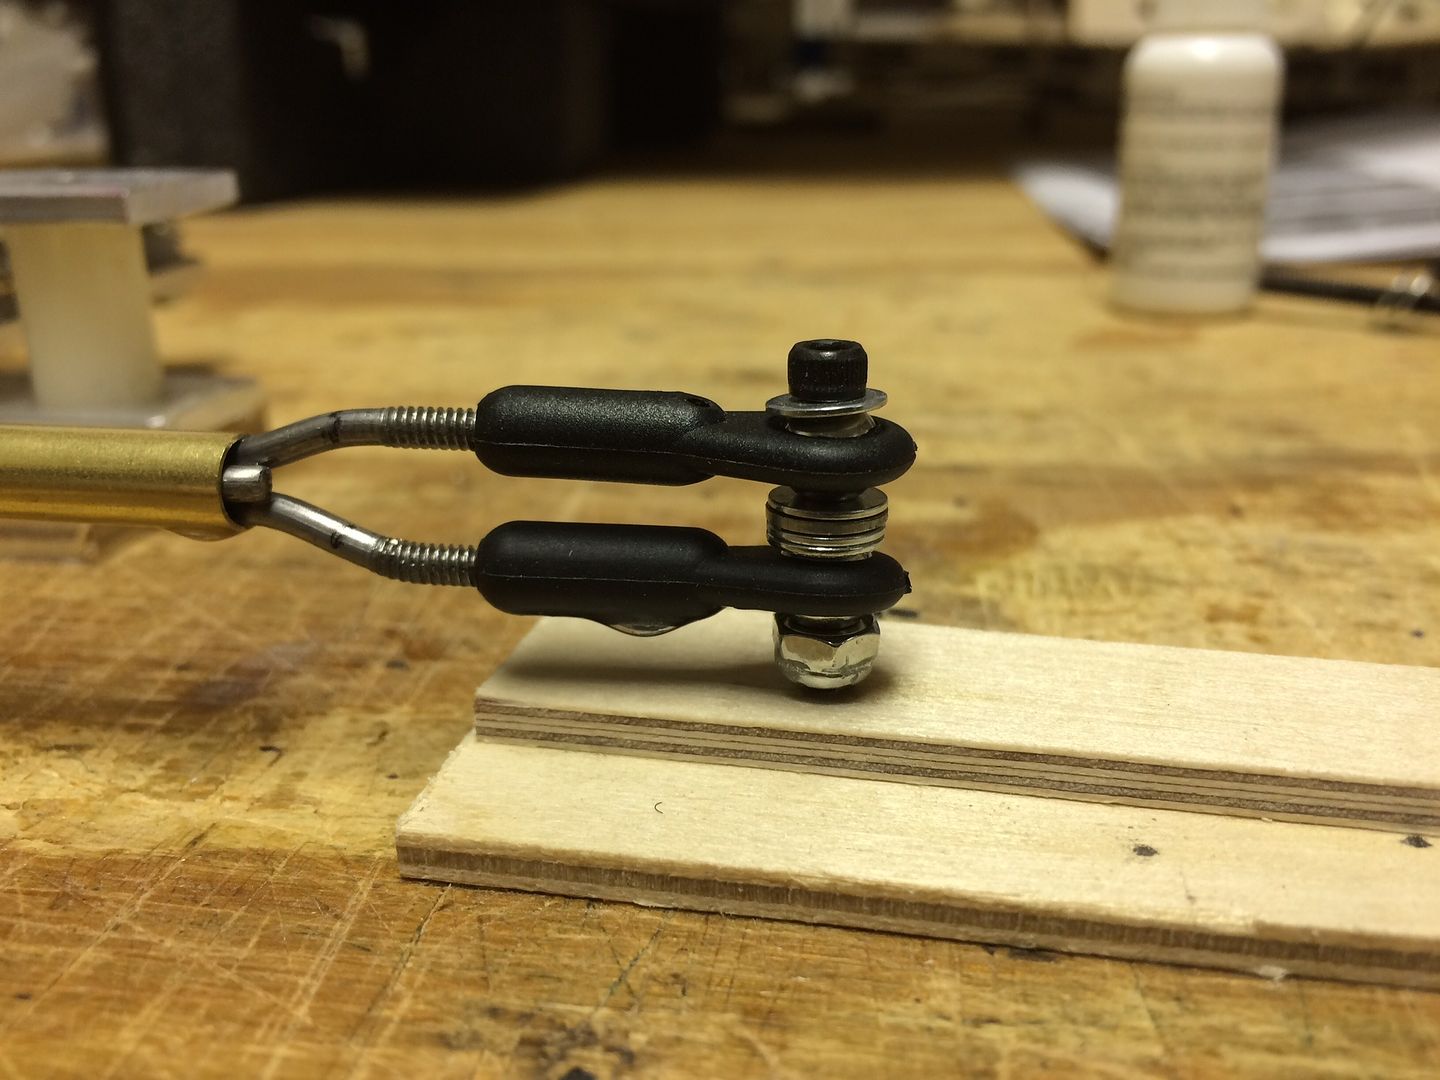
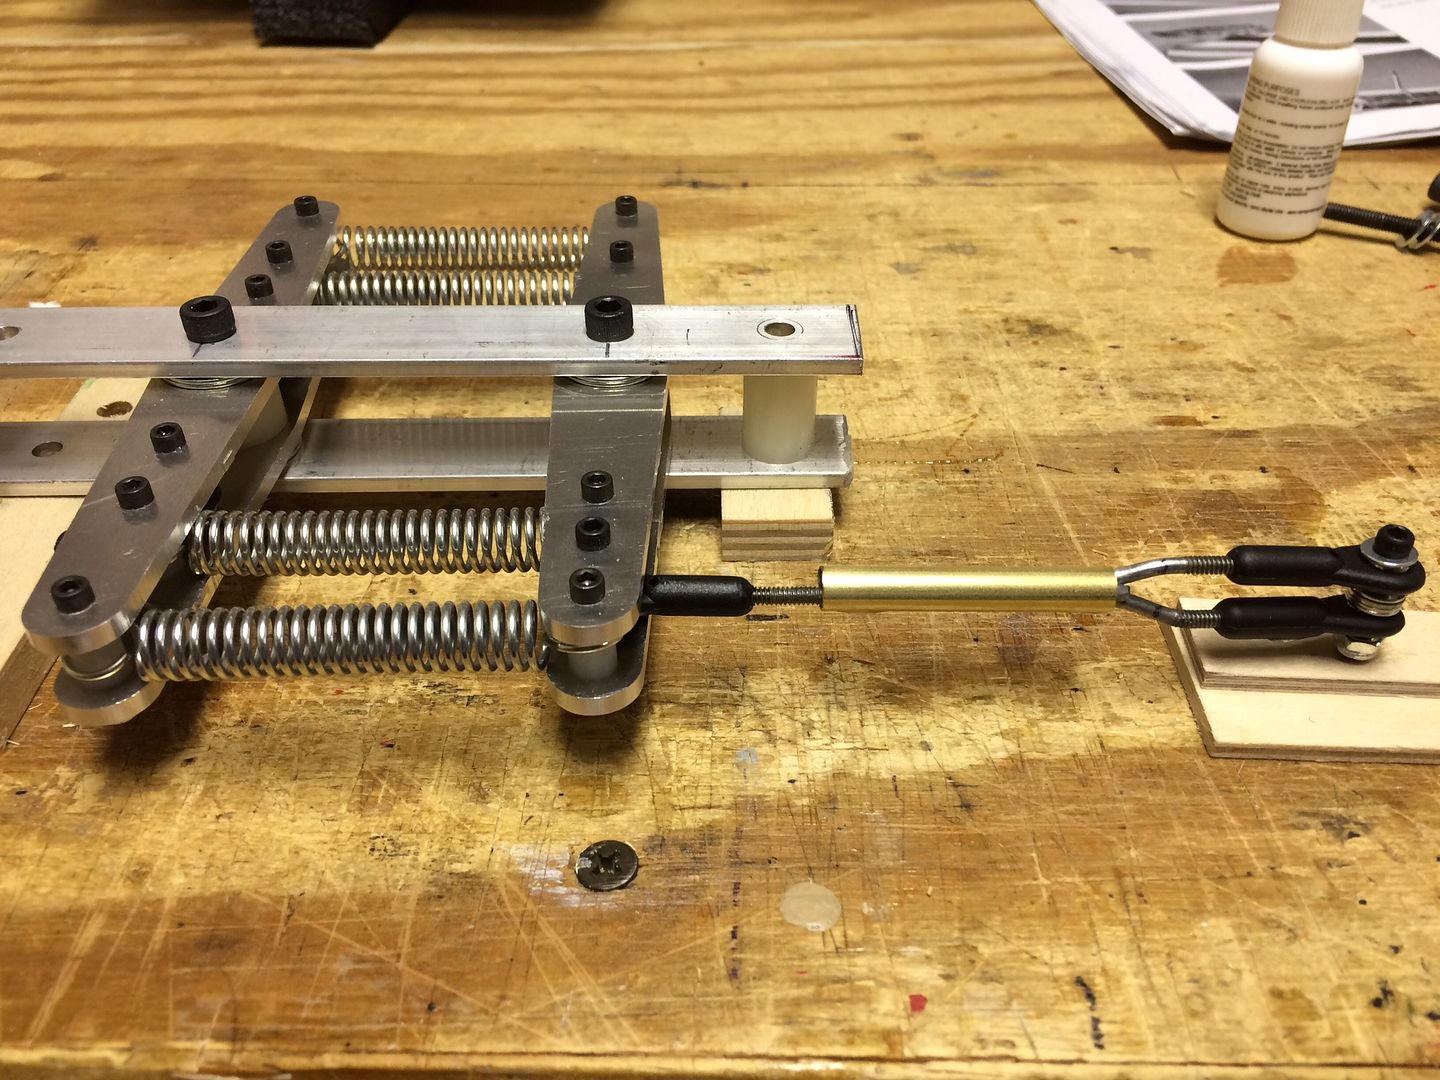
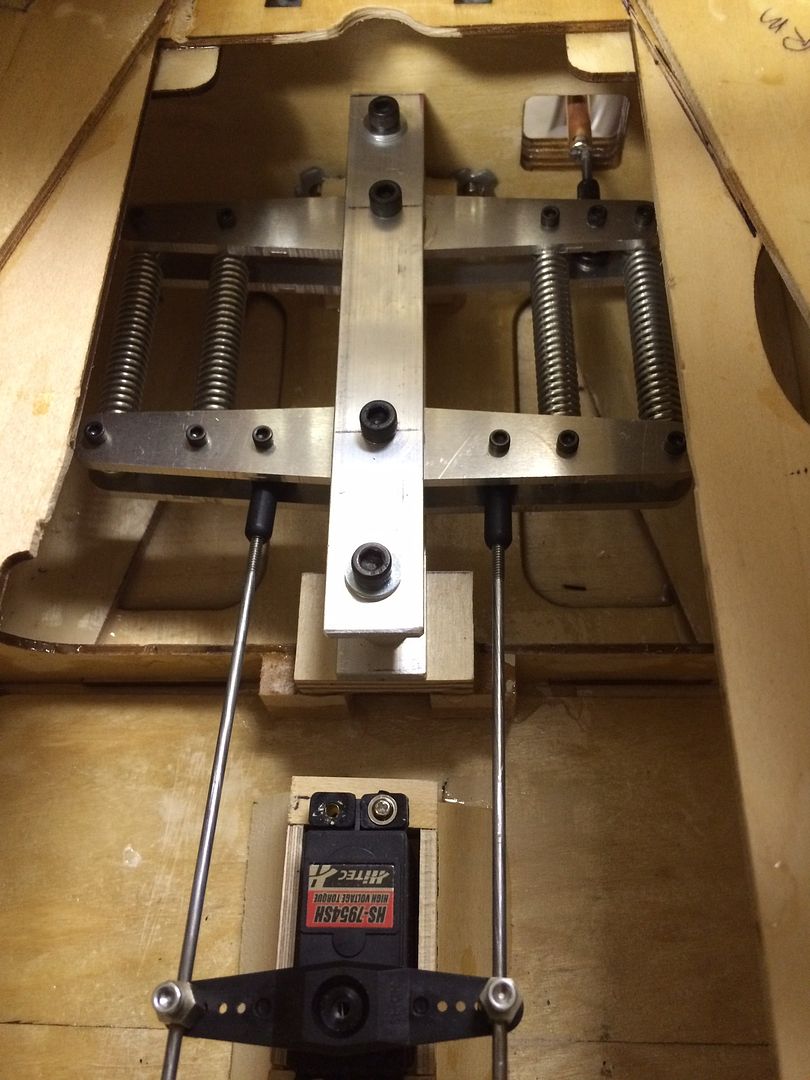
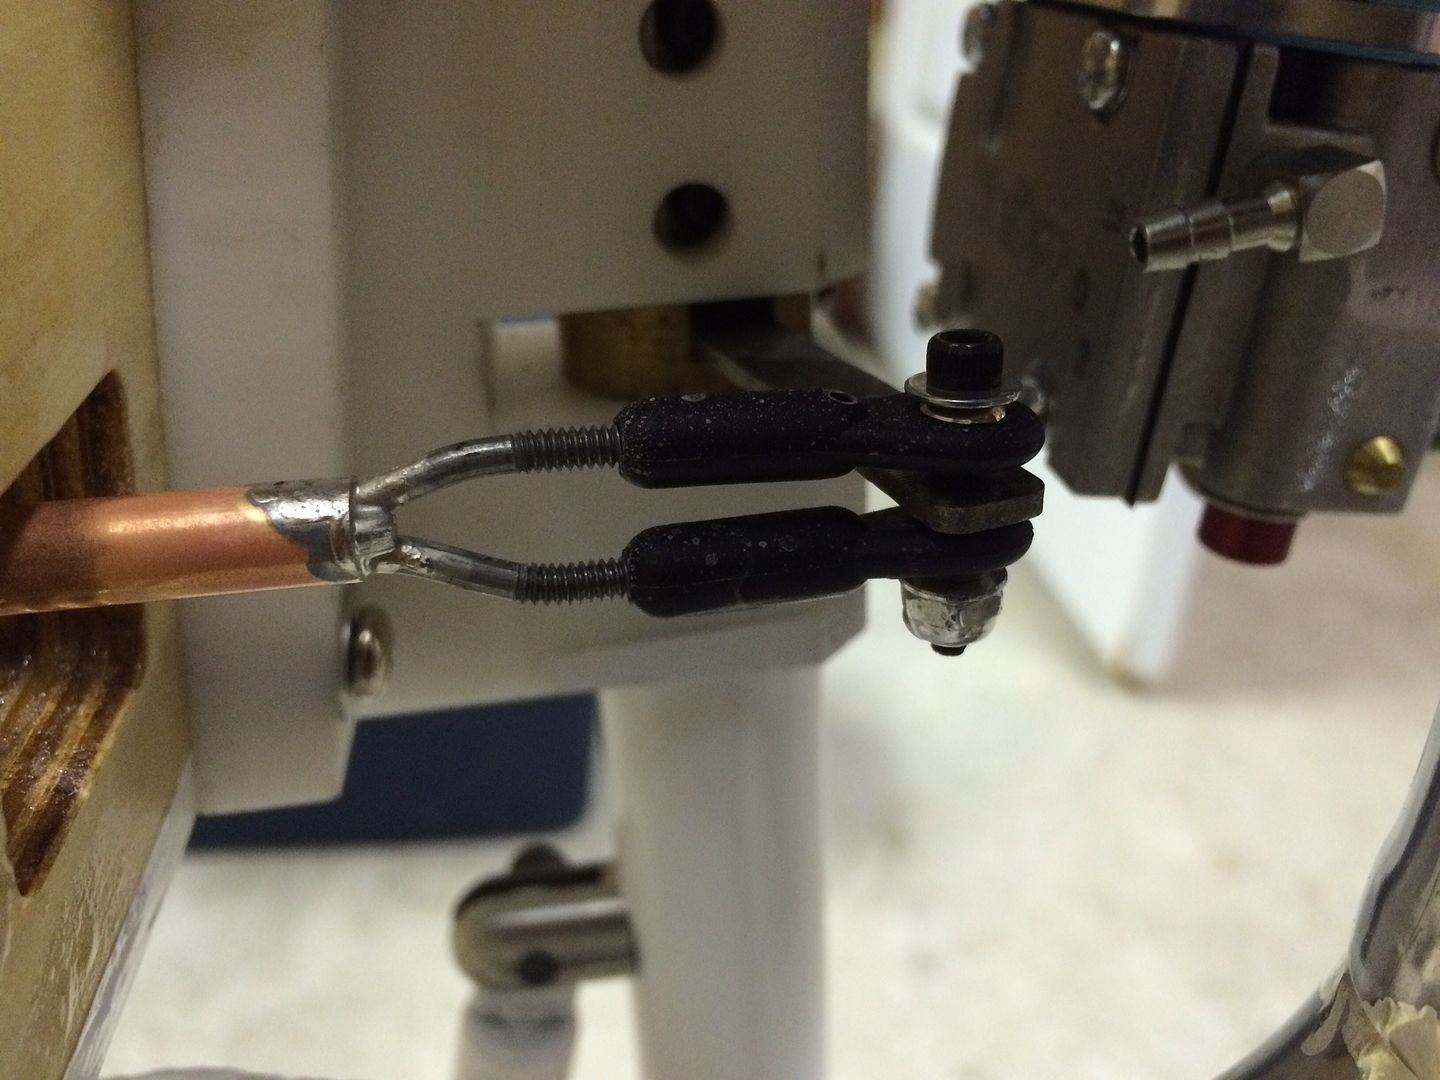
Seems to work good on the shop floor, we will see...Leave a comment:
-
Looking good Jim. Seems like one step forward and two back is common. Good to take a break. Are those disc brakes I see? Nice.
Steve KLeave a comment:
-
When I got up this morning, the plan was to glue on the stab fairing that blends the fuselage into the stab. All seemed to be going well, I placed the part on the stab, traced around it with a fine line Sharpie and then used a T-pin to stick holes through the UltaCoat so the glue could grab on better. Next, I squeezed a bead of Zap Goop around the bottom of the fairing and dropped it in place. As per Murphy"s Law, it was at this point that I realized that the fairing did NOT follow the contour of the stab and no amount of pressure would make it fit down properly...what to do...take it off before the glue really takes a set.
At this point I was so aggravated that it was time to walk away and do something else, so I went to the mountain and shoveled the dirt pile out from in front of the steps. We had to dig down into the slope of the filed at the bottom of the stairs and the excess dirt was just piled in front of the stairs.Got that job done and admired the steps for a while until I was ready to come home and start in on the Bidule again.

The other thing that I have been dreading is making headers. The drop needed is way more that any of the stock headers. I bought 90 mm drop headers and a short length of extension pipe (65 mm long). Next, I tried to separate the flange from the pipe, but it did not want to let go so we moved on to plan B. We measured down 25 mm from the flange and cut the pipe apart, Our extension was only flared on one end, so we used a socket as a dye, hammered it into the end of the pipe and made a very nice flare. Once soldered in, we checked the fit and it looks perfect.
Okay, now to fix that fairing...Decided to use our heat gun and soften the fiberglass part. Once it started to soften, we pushed it down onto the stab and it took a nice set. Okay, now for the glue and a second attempt...worked out very nice this time!
Leave a comment:
-
We wanted a pushrod that is thicker than standard 4-40 so, after some searching, we ordered these turnbuckle rods. The different lengths are perfect for the flap and aileron hookups.
In order to get them to thread into the ball link fittings, we had to drill out the hole in the fittings with a 7/64" drill bit.
Leave a comment:
-
The horns for the ailerons and flaps were missing from our kit, so we used DuBro 8-32 horns.
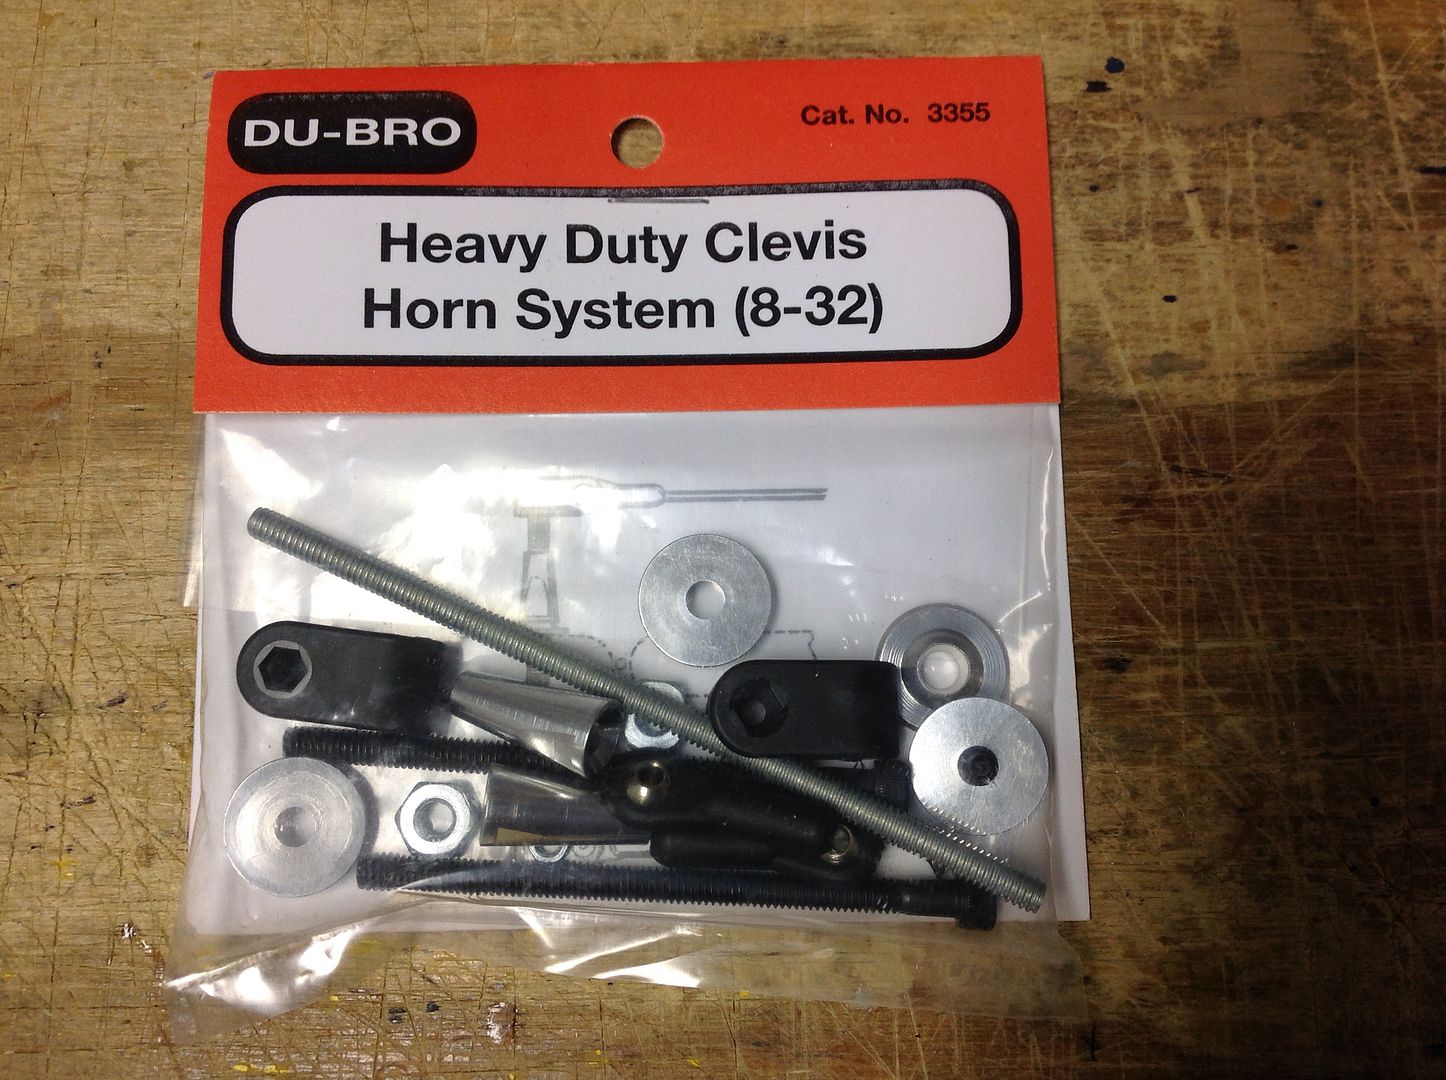
The supplied bolts are about 2-3/4" long, but we changed them out with 3" long bolts for better control hookup geometry. I found 3" long socket head bolts at Micro Fasteners.
 Last edited by JimD; 03-11-2016, 01:18 PM.
Leave a comment:
Leave a comment: