Announcement

Collapse
No announcement yet.

Aeroworks 40% Carbon Cub Users Thread

Collapse
X
 
  • Filter
  • Time
  • Show
Clear All
new posts

  • #61
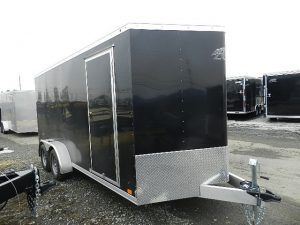
    When I ordered my Carbon Cub, my plan was to put it in my Van...along with the other models. I asked for many measurements, to assure myself that it would fit...the length of the fuselage, the height of cabin, the width of the landing gear. It was not till the first time I went to load it into my Van that I realized that with the stabs on, I didn't have much room for the other models and it required a second person to help me get it in and out. As I am a fickler, when it comes to putting models together quickly, I realized that if I had to remove the stabs every time I flew, along with folding and unfolding the struts, that I would be spending a total of an hour or more for every flying session just for assembly and disassembly!! That was why I broke down and bought a dedicated trailer for the Carbon Cub. I don't really like having to pull a trailer, but as it worked out, I have the Carbon Cub trailer set up so that everything to do with the tug, fuel, tools, towropes, spares...etc... are in the trailer and ready to go. If I'm going to an event that needs a tug I just hook up the trailer and go. Since I added the "no tools required" wing and strut attachments I can put it together and take it apart, in just a few minutes, without any help.

    Pete

    Comment


    • #62
      @BobM...here you go Bob

      Get the best prices on new & used trailers at Trailer Superstore. We're a one-stop shop for all your trailer needs! Delivery and financing available.


      Your pull-out and your tongue box will transfer right over. The 6x12 will hold both tow planes plus all of you sailplanes.

      Motto...a new trailer each year to keep up with the modeling gear!

      ***plus, Matt needs your trailer. 😉
      A Site for Soar Eyes

      Comment


      • #63
        looking good Bob...can't wait to see her fly and get a few tows from ya! will she be at turkey tow by chance!?

        hhhhmmm that trailer now could be something for down the road Jim/Bob...would have to cut an opening in my fence to park her though! Just picked up another newer used Grand Caravan to replace the one that hit the poor deer. She will fit most of my stuff, even 6m DG800 wings!.....until I get a Bidule

        Matt

        Comment


        • #64
          Hi Jim.....I think I will stay with my trailer for quite a while......unless I want to sleep in it on a semi permanent basis

          I thought about a wider trailer, but my driveway at home has a limited width unfortunately. The max trailer width is 4' because of this (6' total width with the tires on the outside). I have been very pleased with the new size...it pulls extremely well and doesn't have too much weight.

          The carbon cub will fit in my transport one way or another.......either the trailer or the back of the car....I know I will figure it out. It might take me a few days and some head scratching, but I'm certain there's a way it will work.

          Matt.....hoping it will be there for the Turkey Tow.....I have to give it a few shake down flights and get the motor breaking in a bit. After a few gallons or so of fuel it should be running really well I think. I will have my bidule as well.
          Last edited by BobM; 11-16-2016, 09:31 PM.

          Comment


          • #65
            Click image for larger version

Name:	20161123_232251_resized_1.jpg
Views:	504
Size:	811.2 KB
ID:	14093

            Looks like a Carbon Cub now.......finally.

            The fuselage is completed other than attaching the windscreen tomorrow morning. Everything seems to work.......so far. Have to wait and see if it still works when I'm at the field.

            Just have to finish up a few details on the wing panels and assemble everything tomorrow to get the throws and expo set and it should be ready for trying out Friday at the Turkey Tow in Salem.

            Bob
            Attached Files

            Comment


            • #66
              sweet...cant wait to see her Bob!

              Matt

              Comment


              • #67
                I was able to get the Carbon Cub finished up for the Turkey Tow today.

                I haven't set up the trailer for taking it flying as of yet, so I had to get it inside my car......it was a tight fit, but all does fit in pretty well.......I was very pleased about that. I had to take the horizontal stabs off for transport. They are pretty easy to remove and then reassemble at the field, but I know that will cause wear on all the parts over time. I hope to figure out a way to transport the fuselage with the stabs attached so I don't have to assemble them every time I fly......something to work on during this winter's building season.

                It had its maiden flight today at Salem. All seems excellent with the plane and it flies really well

                I had Len look things over with me a bit before firing up the engine.......this was the first time it was started and it ran perfectly. A few flips with full choke to get the fuel through the lines and into the carb and then a few more flips until it fired.......then choke off and 3 flips and it came to life. So far I haven't made any adjustments to the high or low end on the carb.The idle is still a bit higher than I want, but with it being a new engine it will need a few gallons or so of gas to run through before it comes up to its full power and gets a really nice low reliable idle. The DA engines are really well made and this 150 is excellent.

                I got the plane set and flying on the first flight. After enjoying myself for several minutes I turned the plane over to Len to get a feel for the setup and help me fine tune things. All is good overall, although I had pretty high throws on the surfaces. Easy enough to tame those down a bit as well as fine tune the flap system and start dialing in the mix of elevator to flap settings. Len did the honors of the landing for me as there was somewhat of a mild crosswind today.

                After a few smiles we decided to get it towing right away........Len was kind enough to tow for me and I had a chance to talk with him and learn a bit more about the Carbon Cub and its flying characteristics.

                I'm not sure how many tows were made, I think at least 4-6 with perfect landings every time by Len..........very smooth and steady with gentle touch downs as the cub settled on the grass and the speed slowed enough for the tail to drop to the ground, then taxi back for another tow.

                On about the 5th or 6th landing Len had made another gentle touch down, the cub was setlling nicely, then the right side of the main gear collapsed. Len handled this without blinking......he cut the engine and kept the plane as level as possible while it settled and finaly came to a rest.......not a scratch on the plane or the prop ! (Many thanks to Len for making it a happy ending to what could have caused some serious damage to the plane).

                We determined the cause to be the right damper, which had failed. Once we had the plane back to the pit area I opened it up and saw the shaft had broken, which didn't allow the internal spring to function anymore. Easy fix.......some good silver solder and heat should work well (Len has offered to take care of this). Luckily I had ordered an extra full set of landing gear when I purchased the plane about a year and a half ago, so I have extra dampners......a couple screws and bolts and it's ready to fly again.

                I'm very impressed with this plane. It flies beautifully and the assembly and disassembly is reasonable. I'm looking forward to getting more time on it very soon.

                Here is a picture of it at Salem. This was taken just before I disassembled it for transporting back home (the string on the landing gear was used to keep the plane up on its wheels until I have a chance to replace the damper).

                Click image for larger version

Name:	20161126_143630_resized.jpg
Views:	487
Size:	872.9 KB
ID:	14165

                I still have a few things to sort out, but it is pretty close to being fully finished now. I want to replace some of the hex bolts with button head bolts. Also there are several places where fully threaded bolts should probably be replaced with smooth shank bolts to prevent wear. A winter project I think.

                Bob

                Comment


                • #68
                  It was a pleasure to fly that today Bob, thanks for the opportunity. You always set your planes up very well, so there's no surprise this flew perfect off the bench. The landing gear breaking was a strange one. Like Bob say's, the landing were all pretty gently and then it just snapped. We could hear it break, which was the spring inside the tube banging around one it let go. There is a shaft that runs through the center of a spring. The shaft has a keeper welded to the end to keep the spring in place when the shock system is compressed. It was the end of the shaft that snapped, right where the weld was... no surprise.

                  Luckily no damage and an easy fix.

                  Lets fly it again soon...
                  Len Buffinton
                  Team Horizon Hobby

                  Comment


                  • #69
                    5 minutes for replacing the dampner on the main landing gear with a spare.....a very easy fix fortunately.

                    Here are pictures of the replacement along with the one that failed which is opened up.

                    Click image for larger version

Name:	20161127_191012_resized.jpg
Views:	472
Size:	505.8 KB
ID:	14191

                    Click image for larger version

Name:	20161127_191025_resized.jpg
Views:	472
Size:	654.3 KB
ID:	14192

                    The shaft has a press fit collar at about 10%/90% the length of the shaft. From what I can tell the fit came loose, which caused the failure.

                    I am thinking of opening up the dampners and using a torch with silver solder to make certain the collar and shaft are held together properly. Hopefully this will prevent a failure of this particular part on the airframe in the future. Should be easy to do and doesn't take much silver solder to make a very solid joint in the parts.

                    I am also going through all parts of the airframe where 8-32 bolts are used and replacing these anywhere they are used as pivot points with new bolts that have a smooth shank through the pivot point. This should also reduce wear and potential failure.

                    Comment


                    • #70
                      I was able to get into the shop for a little while tonight and set up my torch. I have a Bernzomatic Oxygen/MAP 2 cylinder system that works very well (red oxygen tank and yellow MAP Pro tank).

                      Using some flux coated bronze brazing rod I brazed the shaft back together. Not quite as strong as silver would be, but at 50,000 to 60,000 PSI tensile strength I have a feeling it will work for this application.

                      I took apart all the other dampners and brazed them also. Hopefully this will help prevent failure of the dampners in the future. I plan on bringing spares with me to the field from now on as well.

                      Here is a picture of the brazed shaft, the bazed part shows the bronze metal brazing material to the right of the collar:

                      Click image for larger version

Name:	20161128_222920_resized.jpg
Views:	495
Size:	607.0 KB
ID:	14241

                      Comment


                      • #71
                        cool...looks like it will be ready for the salem hohotow!

                        Matt

                        Comment


                        • #72
                          Congrats on the successful test flights Bob! Interesting landing gear failure..I've never seen that one before.
                          I wish I had known they were not going to produce the model anymore I would have bought an entire set of all the landing gear parts...all I have is an extra set of struts.
                          Pete

                          Comment


                          • #73
                            Hi Pete,

                            Many thanks !

                            I thought it was odd the struts failed also, but on closer inspection of the dampner struts it looks like they were all press fit at the collar joint. Brazing them solved that issue I think.

                            I was fortunate to have bought an extra set of the landing gear when I purchased my Carbon Cub. I also did as you did and purchased an extra set of the struts. I only wish I had also gotten some extra windshields too.

                            I'm replacing the 8-32 fully threaded hex head cap bolts with ones that have smooth shanks, and customizing them to fit all pivot points. This should keep these locations from being eaten by the threads over time.

                            Bob

                            Comment


                            • Xroadie
                              Xroadie commented
                              Editing a comment
                              I should clarify Bob...I have a set of the triangular main landing gear struts, bot not an extra set of the damper struts.

                              ....and I did the same thing with the pivot bolts....switched to stainless as well.

                              Pete

                          • #74
                            I found hex head cap screws that are just about perfect for any pivoting parts such as the landing gear and wing struts on the Carbon Cub. They are #8-32 18-8 stainless steel Exact Grip Length Flanged Socket Head Screws from McMaster Carr:

                            https://www.mcmaster.com/#standard-s...crews/=15ddqu5

                            The link takes you to a general page for socket head cap screws, then look for these on the right side column just past halfway down.

                            I found that the main gear needs 6 that have a 3/4" grip length, and then an additional 4 that have a 1/2" grip length. The struts have a mixture of 1/2" grip length and 3/8" grip length depending on the position.

                            There are 4 screws and nuts on the struts that are #8-32 button head, this allows the strut to be folded without causing damage to the wing. These are fully threaded as the do not need to pivot as much.

                            I installed them on the landing gear so far, the struts will be next a bit later on tonight. I am using all new nylon insert 18-8 stainless steel lock nuts as well along with a single #8 washer on the nut side.

                            Here are a couple pictures of them for reference of size and also an installed one on the main landing gear strut:

                            Click image for larger version  Name:	20161207_181617_resized.jpg Views:	1 Size:	56.1 KB ID:	14385Click image for larger version  Name:	20161207_182750_resized.jpg Views:	1 Size:	403.0 KB ID:	14386

                            Comment


                            • #75
                              Great find Bob!!!

                              Comment

                              Working...
                              X