Announcement

Collapse
No announcement yet.

Aeroworks 40% Carbon Cub Users Thread

Collapse
X
 
  • Filter
  • Time
  • Show
Clear All
new posts

  • #31
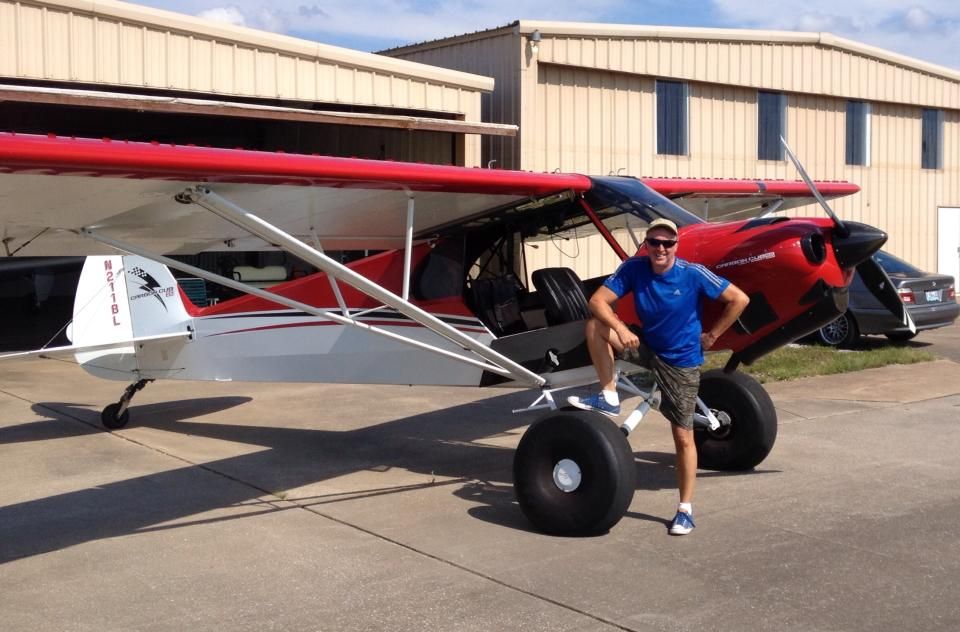
    After a long time out this fall I am back to work to finish up my Carbon Cub. New ignition boxes are on their way from DA engines and hopefully I'll have the airframe completed early next week.

    I'll complete the install of the canisters and also the electronics over the next several days and should be ready to complete the radio programming over the weekend.

    Bob

    Comment


    • #32
      I made two upgrades to the Carbon Cub that greatly speed up assembly and disassembly. The best part is I can put it together without any tools. Both items I used have been mentioned here on this forum in other threads…so they are nothing new.

      Part 1. The wings slide on a single carbon tube and to secure them to the fuselage you have to drive in four bolts inside the upper cabin, two into each wing root, even with the ample access through the side windows which hinge up, you have to go through some contortions to drive the screws in, if the model is on the ground. To speed this up I adapted the slide catches that Asher came up with from McMaster Carr.

      http://www.mcmaster.com/#1872a72/=11ooxwf

      It was a very easy adaptation as the stud, that comes with the slide catch, has an 11/64” hole which fits the diameter of the 8/32 bolts that hold on the Carbon Cub wings perfectly. I used some stainless socket head cap screws. I slid the stud on the cap screw, then locked it in place with a some Locktite and a nut. A second nut and a washer will set the stud length once the proper length has been determined.

      Here’s a photo of the stud and cap screw set to the proper length in the wing root.


      The catches them selves mount inside the cabin you must drill a 1/2” hole to allow the stud to pass through. On the aft locations the catch overlaps an opening for in the cabin that allows servo wires into the wing. I made a plywood mounting plates to overlap the openings and mounted the catches to them. On the fore locations for the catch there was no opening to span so no plate was needed, however I discovered that I could not set the stud deep enough to get a snug capture with the latch. To remedy that I made a second plate for the forward latches that acted as a stand off to allow more depth for the stud and two nuts that I used on each socket head cap screw. The stand off could be eliminated if you silver solder the stud to the socket head cap screw.

      Here’s a shot of the aft latch.


      Here’s a photo of the forward latch. Due to proximity to fuselage structure it could not be placed horizontally and had to be mounted diagonally as shown.


      To fit them, simply put the wings on the fuselage with studs a little high, then snap the catch over the stud. Torque down the socket head cap screw stud combo until you get a firm capture Remove the wings and tighten down the inner nut against the washer at the base of the socket head cap screw to set the height of the stud.. Mine actually draw the wing in tight to the fuselage with them adjusted properly. What used to take five minutes now takes about 20 seconds

      Part 2 will be about upgrading the lower strut ends from 8-32 bolts to 10-32 bolts and adding Easy-Adapt Clevis Rod Ends.

      Comment


      • #33
        And another happy convert........

        Comment


        • #34
          Part 2.The Carbon Cub has wing struts connect to the fuselage with 4 nuts and bolts that attach to a tab on the rear landing gear bracket. I decided to add the same quick release clevises that I used on the Pawnee, that Len found at McMaster Carr. On the pawnee the struts came with 4mm threaded rod, which was the smallest metric size available from McMaster Carr. The Carbon Cub comes with 8-32 threaded rod on the strut ends, but the smallest clevis available were 10-32. I had already upgraded the 8-32 threaded rods to 10-32 on the rear strut fittings. On my Carbon Cub and on other Carbon Cub owners models the rear lower strut fittings have failed and snapped off. Len showed me how to upgrade the strut ends from 8-32 to 10-32, when one of my rear struts failed at SERA last spring. When I got home I retrofitted the other rear strut fitting the same way. To add the quick release clevises to all four strut ends I needed to upgrade the two remaining 8-32 strut ends to 10-32. Here is how to do it. Note, that even if you do not plan on using the quick release clevises, you will want to upgrade the the strut ends to 10-32, especially on the rearmost struts.

          Here is the McMaster Carr part required…
          http://www.mcmaster.com/#2447k11/=11oxuxn

          Start by removing the old 8-32 bolt from the strut end. The strut is a hollow aluminum tube with a wooden plug in the end that captures the 8-32 bolt head. There is a steal pin driven through the end of the strut laterally that captures the head of the bolt. Remove that first. Sand a little paint off the strut on each side to reveal it.


          On a flat surface use a small hammer and a punch to loosen the pins. I then used a a small finish nail to drive the pin out far enough so that a I could pull the pin the rest of the way out with a pair of pliers. Do not try to drive the pin all the way through with the punch as you will damage the aluminum strut tube.


          With the pin removed you can now use various sized drill bits to mill out the wood around the bolt and bolt head. Do not remove all of the wood inside the strut so that you don’t have a bottomless cavity to fill with JB Weld when you insert the new 10-32 bolt.


          One down, one to go.


          To fit the new 10-32 bolt into the strut you will need to grind the head of the bolt/machine screw into a flat T-shape.


          To be continued....
          Last edited by Xroadie; 04-29-2016, 03:04 AM.

          Comment


          • #35
            ​Continued......

            Before filling the cavity with JB Weld, tape over the the holes left after removing the steel pins to keep adhesive from spilling down the side of the strut in the next steps.


            You can either pour in some JB Weld at this point and add the 10-32 bolt, but I first placed a few drops of 15 minute epoxy in to “tack” the bolt into upright and vertical position first. A couple shims held the bolt while the epoxy sets.


            Once set, remove the shims and fill the void around the bolt with JB Weld. Add masking tape to protect the threads if you are sloppy.


            After the JB Weld has cured, I cleaned up the strut end with sand paper, in preparation for paint. Note the threaded rods/bolts were left long and will be cut to length later.


            Here are the finished strut ends with the new quick release clevises in place.


            The lower strut brackets need to be drilled out slightly to a 3/16” hole for the new clevis pins. The mouth of the clevis is also much wider than the original hardware. The keep the clevises from rattling around on the bracket, I thickened the bracket by adding washers to the top and bottom of the bracket. These were silver soldered in place.


            Along with the previously mentioned cabin/wing slide latches, these quick release clevises have greatly reduced the time it takes to get the wings on and off the Carbon Cub….and best of all….no tools required!!

            Pete
            Last edited by Xroadie; 03-25-2016, 02:56 PM.

            Comment


            • #36
              Very nice step by step Pete.
              Len Buffinton
              Team Horizon Hobby

              Comment


              • #37
                Pete,
                Once the JB Weld set, did you drill out the small hole and replace the pin?
                A Site for Soar Eyes

                Comment


                • #38
                  Originally posted by JimD View Post
                  Pete,
                  Once the JB Weld set, did you drill out the small hole and replace the pin?
                  No Jim....JB weld is much stronger than the wood that held the original bolt. I figure the JB Weld will grab the irregularities of where I milled out the wood and with the JB Weld seeping into the holes left by the pin, there was no need for another pin.
                  Pete

                  Comment


                  • JimD
                    JimD commented
                    Editing a comment
                    Okay, thanks. That is what I gathered from the pictures but I wanted to be sure.

                • #39
                  I flew the Carbon Cub at SERA last week and it gave me a chance to trust that the recently added wing latches and quick release clevises, worked as advertised. It was so much easier to assemble as well as disassemble the model and more importantly….nothing came loose!! I say thumbs up to both

                  One thing that did happen to me was losing a flap servo on two different days!! On Thursday after making several tows, I noticed it was very hard to keep the wings level on one landing…as in scary hard!!! Only after touch down did I notice that only one flap was down….no wonder!!!

                  All surfaces on my Carbon Cub use the same Spektrum S6030 servos…they are the surface version of the A6030 servos, which coincidentally run all the control surfaces on my 50% KA6. I like the convenience of not having to carry a lot of different spare servos.


                  When I assembled the Carbon Cub Spektrum no longer made the A version….but still sold the S version. The only difference is the length of the servo lead and the position of the mounting lungs on the case….the lugs on the S version sit higher.


                  I liked the 6030’s because they are generally tough servos…278 oz-in and priced in the $60-$70 range.

                  All servos on the Carbon Cub….ugly as they may be, are all surface mounted…..not hidden under hatches and very easy to swap out. I swapped the dead servo out in minutes and flew again. Then on Saturday…the same thing happened. I have been flying the Carbon Cub for most of two years and never lost a flap before….much less two in a matter of days!! When it happened on Saturday it really threw me for a loop as I was not expecting that to repeat itself….I was sure I was having some sort of radio interference or a problem with the I-gyro and decided to land way short of and away from the flight line, for fear of the model going out of control into the pits. After I got it down I could see again that I had lost a flap…after consulting with Peter Goldsmith he suggested I upgrade to the Spektrum A6265 servo, which seam to be the replacement for the 6030 servos.


                  They are HV servos that put out 328 oz-in of torque. Len had a couple and I swapped out the dead 6030 and the still working one with the 6265 servos. Swapping them didn’t take long, but because the 6265 servos have the new pug-in servo lead, which sticks out a little more from the servo, I had to relieve the underside of the servo rails to get them to wedge in. My moto-tool and micro sanding drum made quick work of that. I did notice that when I fired up the model after the install that the 6265 servos had to be reversed and that their travel volume was not the same as the 6030’s so the travel and centering of the flap servos had to be readjusted. The swap took about 45 minutes and I did get back in the air for a few more tows on Sunday.
                  Last edited by Xroadie; 04-29-2016, 08:21 PM.

                  Comment


                  • #40
                    YOW. Glad all turned out okay. You know my answer... JR 8411HV @ 240 or the NX8921 at 504 ounces. My weapons of choice.
                    Team PowerBox Systems Americas... If flying were the language of men, soaring would be its poetry.

                    Comment


                    • #41
                      Back to work on my Carbon Cub after a long break.......working on the fuselage today to install the gas tanks, headers, and also make the compartment behind the wing for battery access. I'll also install the tow release and servos.

                      The engine is mounted fully, completing the install of the canisters internally below the fuselage cabin floor.......thank you to Len and Pete for all the input and photos of your work on this airframe, it has been an excellent resource for getting things figured out here.

                      Servos are all installed on the wings, horizontal stabs, and rudder. The radio equipment has preliminary programming complete. I'll complete the connections from the servos to the control surfaces when I have the electronics completed inside the fuselage and have a chance to finish the wiring harnesses with connectors.

                      The servos of choice are the JR NX8921 for all the control surfaces (ailerons, flaps, elevators, rudder). I know they have released the NX8931, but I'm not aware of the differences between the different versions at this point. These servos are really great, they can be used as standard servos with any radio system and also are fully programmable with the JR DMSS XBus systems.

                      Aiming to have this ready to fly the week before Cumberland and bring it on the trip there.

                      I'll post some pictures later this afternoon after I have the work completed.

                      Comment


                      • #42
                        I got to fly the Carbon Cub today

                        Comment


                        • #43
                          How big is your trailer for that one Pete

                          Jeremy and Ben
                          SCCAAA TT TN

                          Comment


                          • #44
                            Looks like he upgraded his strut fitting too.
                            Len Buffinton
                            Team Horizon Hobby

                            Comment


                            • #45
                              Originally posted by lenb View Post
                              Looks like he upgraded his strut fitting too.
                              LOL yeah.....that and a few other upgrades Check out those tires 26" Tundra tires!! He also went with the uncovered, 3 inch taller, landing gear strut option.

                              I wonder where I can get a couple 12 inch ballon tires

                              BTW...I got about 30 minutes of stick time from the back seat....it is very stable! The elevator trim, was a rocker switch on top of the joystick...talk about easy to adjust!!

                              Comment

                              Working...
                              X