Announcement

Collapse
No announcement yet.

Graupner Cirrus X 3

Collapse
X
 
  • Filter
  • Time
  • Show
Clear All
new posts

  • #16
    Spoilers are in. I was lucky that the spoilers happen to fit exactly between ribs R70 and R77. So all I had to do was make some plywood rib doublers using ribs from one of the other kits, glue them in and build a box in between. There will be just enough space for the aileron servo wires to pass beneath the spoilers. Click image for larger version

Name:	640IMG_4382resize.jpg
Views:	809
Size:	149.1 KB
ID:	11028
    Click image for larger version

Name:	640IMG_4383resize.jpg
Views:	753
Size:	131.0 KB
ID:	11029
    Click image for larger version

Name:	640IMG_4385resize.jpg
Views:	755
Size:	162.8 KB
ID:	11030
    Click image for larger version

Name:	640IMG_4388resize.jpg
Views:	715
Size:	152.5 KB
ID:	11031
    Click image for larger version

Name:	640IMG_4389resize.jpg
Views:	765
Size:	107.9 KB
ID:	11032


    Next will be the servo bays but I need to order some servos, so in the meantime I will get the tail feathers done.

    Comment


    • #17
      Art, are those mechanical or electrically driven spoilers? How long? Where did you get 'em?

      Comment


      • #18
        Hey Michael, they are mechanical servo driven spoilers. Larry's friend Terry gave them to me. I don't think they are being made anymore.
        Click image for larger version

Name:	640IMG_4292resize.jpg
Views:	726
Size:	139.0 KB
ID:	11095

        Comment


        • #19
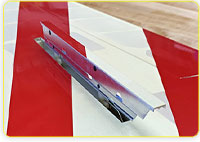
          Thanks Art! The reason I ask is that I have an old 4M hollow molded Nimbus 4D and one spoiler is defective and can't be easily repaired. The airframe itself is pretty nice, if small, but the spoilers are crummy. I have put this Nimbus on and off the bench more times than any other model with which I have ever fiddled! It's getting pretty close to the 'round file' if something positive doesn't happen soon! The ones you have look to be better items. Guess I'll gamble and purchase some from Etienne at Icare.
          Comment


          • #20
            It sounds like something worth fixing. Esprit Model has a good selection.
            Anything and Everything for electric flight, your electric superstore, Helicopter store


            If you do decide to get rid of it let me know. The 4 meter size planes tow nice with our 1/4 scale tugs.

            Comment


            • #21
              Thanks, Art! Those spoilers in the link look just like the ones in my bird. Tiny eyelets are used as hinge pins on plastic levers. That is where the problem lies. The eyelets 'unsnug' with use as they are press fit. Since their 'shank' is tapered the levers tend to wobble causing hang ups as the eyelets migrate in and out of their holes. They won't easily fall out (but can) since the blades tend to overlap their locations in the levers. Hope all this makes sense. The ones I have will hang under negative 'G' and that isn't good if one hangs and the other doesn't! Your one blade design is better than those two blade ones, methinks! Cheers, Michael

              Comment


              • #22
                Michael, here is a video by Len on maintaining spoilers. Might be helpful.
                Enjoy the videos and music you love, upload original content, and share it all with friends, family, and the world on YouTube.

                Comment


                • #23
                  Well it's been a while since my last update. A few distractions kept me away from this project but I'm back now. Instead of doing the tail feathers next I changed to the fuselage. I tend to do the hardest parts first and the fuselage was most on my mind.
                  These fuselages have a lot of pinholes and voids and I found a filler I wanted to try. From the System Three website:
                  "QuikFair is a lightweight, microballoon-filled, fast-curing two-part epoxy fairing putty with excellent moisture resistance. The two color-coded parts have a non-sagging, butter-like consistency and are easily mixed to form a third color."

                  It's a bit pricy but it works great and is easy to sand. Click image for larger version

Name:	640IMG_4402resize.jpg
Views:	716
Size:	126.2 KB
ID:	12282
                  Click image for larger version

Name:	640IMG_4403resize.jpg
Views:	686
Size:	123.8 KB
ID:	12283
                  Click image for larger version

Name:	640IMG_4404resize.jpg
Views:	713
Size:	120.6 KB
ID:	12284


                  One of the distractions I mentioned was the addition of a milling machine to my shop. I used it to make the servo tray. Click image for larger version

Name:	640IMG_4401resize.jpg
Views:	730
Size:	110.3 KB
ID:	12285


                  I made the formers out of some scrap foam. They are hand sanded to fit the inside of the fuselage at their respective stations. I then glued them onto the push rod sleeves with Gorilla glue. After that cured they were glued into the fuselage with the same glue. The glue can be put on thin and it will expand to fill any gaps. Click image for larger version

Name:	640IMG_4405resize.jpg
Views:	721
Size:	134.4 KB
ID:	12286
                  Click image for larger version

Name:	640IMG_4406resize.jpg
Views:	694
Size:	82.9 KB
ID:	12287


                  I glued in the wing rod sleeves with Smooth-On EA40 epoxy. It's an epoxy I use for laminating recurve bows. It stays put and doesn't run or sag. Click image for larger version

Name:	640IMG_4410resize.jpg
Views:	688
Size:	88.8 KB
ID:	12288
                  Click image for larger version

Name:	640IMG_4408resize.jpg
Views:	673
Size:	105.6 KB
ID:	12289


                  Next I'll work on the tail.
                  Attached Files
                  Last edited by ingrahal; 08-15-2016, 07:49 AM.

                  Comment


                  • #24
                    hello Ingrahal I bought the Graupner Cirrus in the early 80's yes 1982 and it still flys very graceful . I built mine with just rudder,elevator and spoilers .
                    im, going to strip the wings which are covered in orange film and add Ailerons ,then recover with white great photos of your construction , brings back
                    memories of building this great glider well done and thank you.

                    Comment


                    • ingrahal
                      ingrahal commented
                      Editing a comment
                      Thanks for the kind words Nigel!!! Sorry for the late reply I've been away from this project since deer season began.

                  • #25
                    I received a PM from neilk with some questions so I thought I would post them here for all to see.

                    cirrus wing mods
                    Yesterday, 02:47 AM
                    Hello there Ingrahal (sorry not sure of your name!)

                    It looks like you have done exactly what I want to do - build new Cirrus wings with ailerons and spoilers.
                    If you have some time, I'd really appreciate some advice

                    After 40 years, I have rejoined the modelling scene :-) I have got my old cirrus flying again but its only
                    rudder and elevator.

                    I have a perfectly serviceable set of wings but without the addition of spoilers and ailerons. Since it's so long since
                    I was building I am reluctant to attempt to modify the old wings (in case I wreck them) and decided to make new.

                    0. I still have the original plans including the transparent overlay which shows some things for ailerons....

                    1. I have sourced all the materials. Good thing the German booklet has metric sizes (which we use
                    in Australia). I've even been able to get my balsa supplier (balsacentral.com) to make me the funny 20x7mm trailing
                    edge. Locating the 1mm ply was not so easy but finally I tracked some down. I had lost my wing rods so
                    I had to make new ones by filing down spring steel to the necessary diameter (I could not locate the
                    desired size) to fit the extant brass tubes. The new brass tubes I have purchased for the new wings
                    have a slightly larger interior diameter but I think the rods are snug enough.

                    Like you I got a rib set from iGull :-)


                    1. Spoilers are my main aim - I recall my cirrus had a habit of flying away so I would feel more
                    confident with these in place. I have purchased servo-less Hobby King spoilers which are about 25.5 cm long
                    and 0.8cm wide and 1cm deep. So I just have to decide where to put them (and how) and get the wires
                    back. So not too hard I hope. Your spoilers are a little longer than mine which will require ribs 70-76
                    to be prepared rather than 70-77 as in yours.

                    1A. Did you cut out all the ribs to receive them before building the wing or did you do that after the fact (so that
                    the wing was built nice and straight and stiff) ? I think from your pictures you did the latter...

                    1B, Did you manage to find a way to fit the spoilers so that they could be replaced if they fail ?
                    Mine are from hobby king (see e.g. https://www.youtube.com/watch?v=pq7Q_l5JIBA).
                    They have a lip which would sit on top of the built up box (like yours) - I'm reluctant to glue them in ! There
                    are 2 holes in the base of the spoiler case which perhaps I could use somehow to affix them but it's
                    not obvious.... I'm contemplating the idea of making the box from thick enough wood that I
                    could insert glue plugs. Then I could drill small holes in the spoiler lip and screw into the glue
                    plugs.

                    1C. How well do they perform ?


                    2. Ailerons - this is the bigger job it seems to me as the building book gives no help on how to do it.
                    There is just the overlay plan with some modest guidance.

                    I have never had a plane with ailerons so its all new to me.

                    So

                    2A. Is it worth the effort ? I flew the original both thermalling and on the slope without ailerons (but really
                    can't remember the performance), and since getting it back in the air haven't had a chance for flying
                    beyond glide tests). I'v read both opinions ("it's fine without" and "must have")


                    2B If I do it, I'd rather not change the dihedral so the other wings still fit the wing rods (I couldn't face filing down more
                    spring steel!). Do you expect it will be fine with 6deg and ailerons ?


                    2C. Did you happen to draw up plans for the modification (or write down any german translations
                    from the overlay plans) that you might consider sharing ?

                    2D It looks to me that one has to add a spar to the rear of the shortened ribs. Did you make that from spruce/pine or balsa (looks
                    like balsa - what thickness did you use ?) ?

                    2E The aileron is 32x10 x 521 mm trailing edge (tapering to 25mm width). I can get 32x9.5 so that will be good enough I think.
                    This is going to a total pain in the ass to shape down to the 25mm width...

                    However, I note your comment that the Aileron spar is angled to the main spar so the aileron spar itself is not tapered. But from
                    your your pictures it does not look like its set at an angle at all (hard to see). Anyway, I guess if I do shape the
                    aileron to be 32mm width down to 25mm width that will dictate the angle at which the aileron spar must be installed.

                    So can you confirm that you did install ailerons with width tapering from 32 to 25 mm ?

                    2F I'm wondering about the linkage which is all terribly complicated and messy to install when the servos
                    are installed in the fuselage. I am contemplating using mini-servos and installing one locally
                    somehow in the wing so all I have to do is get wires back. So I'm wondering how you did yours.


                    Finally a simple question.... Glue .... I plan to use TiteBond wood glue for most of the wood
                    work (I'll probably join sheets with CA as some experiments seem to work best
                    with that) and epoxy on the brass tubes. Would you consider epoxy for affixing the spars
                    also ?


                    Aren't they beautiful planes :-)


                    many thanks
                    Neil

                    neilkilleen@hotmail.com

                    My Reply:

                    Today, 11:24 PM
                    Hello Neil, My name is Art. I'll post my answers here per your numbering.

                    1A: The ribs were cut after framing up the wing.
                    1B: I'm either going to glue them in with RC56 canopy glue which stays soft or small screws as you suggest.
                    1C: I can't say how well they will perform but I'm thinking they will be adequate.
                    2A & 2B: If Aerotowing they are a must, if not then they become more optional. I have been told that the ailerons were not very effective on the kit built planes. Which I can understand with 6 deg. of dihedral. I removed 3 deg. of dihedral and am hoping that is enough to make the ailerons work. The full scale plane has 3 deg. Also, to me, the Cirrus looks a little strange with 6 deg. of dihedral. 3 deg. looks much more scale to me.
                    2C: I will be glad to share the translations. As soon as I get a chance I'll post photos.
                    2D: 1/8" X 1/2" balsa.
                    2E: Look at the first photo in post #14. You can see the angle of the aileron spar. Yes 32 mm to 25 mm.
                    2F: I'm installing the aileron servos in the wing in the standard way, a boxed in bay with servo mounted to the inside of the cover.

                    I use thin, thick, and extra thick CA depending on the application. I like Titebond for applying sheeting and leading edges due to it's slow drying and sand- ability. I use various epoxies depending on the application. I used CA on all ribs, spar caps, sheer webs, joining leading and trailing edges and joining pieces of sheeting. I used epoxy on the joiner tubes in the spars.

                    Yes they are!!!

                    Comment


                    • #26
                      I'm finally getting this project going again. I have continued working on the fuselage getting it ready for paint. I like to get as much preliminary stuff done as possible before painting to minimize handling and wear and tear on the paint job.

                      The servo and Rx trays are glued in.
                      Click image for larger version

Name:	640IMG_4432resize.jpg
Views:	655
Size:	136.6 KB
ID:	15223
                      Click image for larger version

Name:	640IMG_4435resize.jpg
Views:	669
Size:	146.2 KB
ID:	15224

                      The bell crank for the horizontal stabilizers is in.
                      Click image for larger version

Name:	640IMG_4426resize.jpg
Views:	657
Size:	145.3 KB
ID:	15225
                      Click image for larger version

Name:	640IMG_4428resize.jpg
Views:	652
Size:	143.6 KB
ID:	15226
                      Click image for larger version

Name:	640IMG_4429resize.jpg
Views:	659
Size:	120.5 KB
ID:	15227Click image for larger version

Name:	640IMG_4430resize.jpg
Views:	686
Size:	153.5 KB
ID:	15228

                      And then the balsa plug is glued in.
                      Click image for larger version

Name:	640IMG_4431resize.jpg
Views:	644
Size:	162.4 KB
ID:	15229

                      I have also started making the servo bays in the wings.
                      Click image for larger version

Name:	640IMG_4424resize.jpg
Views:	648
Size:	158.6 KB
ID:	15230
                      Click image for larger version

Name:	640IMG_4425resize.jpg
Views:	654
Size:	151.9 KB
ID:	15231

                      That's it for now. I'll start on the other two fuselages next so I can paint them all at once.

                      Comment


                      • #27
                        Well I thought I had fuselage #1 ready for paint until I realized the vertical fin and rudder are both sheeted with 1/16" balsa. I decided it would be better to paint these surfaces rather than cover them with Ultrakote. So I proceeded with building them.

                        Fairly standard construction. Sheeting down first, then glue the spar and ribs followed by sheeting and then the end caps.
                        Click image for larger version

Name:	640IMG_4436resize.jpg
Views:	661
Size:	183.5 KB
ID:	15322

                        Beveling trailing edge.
                        Click image for larger version

Name:	640IMG_4437resize.jpg
Views:	657
Size:	191.8 KB
ID:	15321

                        Done deal.
                        Click image for larger version

Name:	640IMG_4438resize.jpg
Views:	667
Size:	201.3 KB
ID:	15320

                        The fin is a little more tricky. Gluing ribs to spar using an angle guide.
                        Click image for larger version

Name:	640IMG_4439resize.jpg
Views:	638
Size:	182.9 KB
ID:	15319

                        Leading edge then sheeting
                        Click image for larger version

Name:	640IMG_4440resize.jpg
Views:	656
Size:	182.7 KB
ID:	15317
                        Click image for larger version

Name:	640IMG_4441resize.jpg
Views:	655
Size:	171.4 KB
ID:	15318

                        Fin is glued to fuselage, faired out with filler and then filled with wood filler to hide imperfections. Click image for larger version  Name:	640IMG_4442resize.jpg Views:	1 Size:	185.5 KB ID:	15294
                        Click image for larger version  Name:	640IMG_4443resize.jpg Views:	1 Size:	155.8 KB ID:	15295
                        Click image for larger version  Name:	640IMG_4445resize.jpg Views:	1 Size:	154.2 KB ID:	15296


                        That's it for now. Next I'll do the horizontal stabs.
                        Last edited by ingrahal; 02-14-2017, 08:16 PM.

                        Comment


                        • #28
                          Be careful with the weight back there.
                          Looks awesome thought..
                          Len Buffinton
                          Team Horizon Hobby

                          Comment


                          • ingrahal
                            ingrahal commented
                            Editing a comment
                            Yeah I had to use more filler fairing things out than I would have liked. Maybe I should just let the wood grain show on the fin and rudder and remove more of that filler.

                        • #29
                          I went ahead and built the horizontal stabs.

                          These are a little bit tedious being built up off the table. My ribs had no building tabs so I made a set of jigs to support the structure.
                          Click image for larger version

Name:	640IMG_4447resize.jpg
Views:	665
Size:	173.0 KB
ID:	15342

                          The spar is tapered and cut from 1/8" balsa. The ribs 105, 107,108,109 and 110 are glued in first then the leading and trailing edges. The rest of the ribs are glued in by holding them in place by hand and gluing with thin CA. Gussets were added and then the stab is lifted and the tip glued on. They build quick though, about 2 hrs per side including sanding everything to shape. One surprise was that the mounting tubes are set at an angle and produce 2-3 deg of dihedral.
                          Click image for larger version

Name:	640IMG_4448resize.jpg
Views:	645
Size:	182.9 KB
ID:	15343
                          Click image for larger version

Name:	640IMG_4452resize.jpg
Views:	616
Size:	119.4 KB
ID:	15344
                          Click image for larger version

Name:	640IMG_4451resize.jpg
Views:	611
Size:	172.7 KB
ID:	15345

                          Of course I had to stick the wings on just to see how she looks.
                          Click image for larger version

Name:	640IMG_4449resize.jpg
Views:	608
Size:	202.3 KB
ID:	15346

                          Well I can't seem to make myself build more than one of these at a time. Even though it would be more efficient it's just too boring to build three of the same thing all in a row. I guess I'll just build them one at a time in the same order I built this one. At least we'll have one in the air sooner that way.

                          Comment


                          • #30
                            That looks Art.
                            I hear what you're saying about building multiple pieces. I find myself loosing focus if a project has been on the board ( pun) too long.

                            Keep churning it out.

                            Len
                            Len Buffinton
                            Team Horizon Hobby

                            Comment


                            • ingrahal
                              ingrahal commented
                              Editing a comment
                              Thanks Len. The other two are rudder elevator only ships and will be identical so maybe I can do them two at a time.
                          Working...
                          X