Announcement

Collapse
No announcement yet.

H9 ASH 31 build, notes and questions

Collapse
X
 
  • Filter
  • Time
  • Show
Clear All
new posts

  • #61
    Finished fabricating my new CG machine so I got a chance to try it out on the ASH31. Worked like I had hope and was very stable.
    Straight sailplane (no motor), fully flight configured it needed 34.4oz (2.15lbs.) to get it to balance right in the middle of the published CG range.
    Click image for larger version  Name:	 Views:	1 Size:	170.8 KB ID:	33317
    Click image for larger version  Name:	 Views:	1 Size:	145.2 KB ID:	33318

    Comment


    • BryanB
      BryanB commented
      Editing a comment
      No bushing or bearings. I've been thinking this thing through for a year. I really wanted one of those "EZBalancers" but after seeing they are $230 I figured I could fabricate my own for less. Ended up being a little over $100 with all new material and hardware. I used 1/4" 6061 aluminum for everything above the tracks. Could probably have saved a couple bucks but by just using flat bar for the spacing bars with holes drilled in them but went with U channels instead.
      As for bushings, not needed. It's not like this thing gets a lot of use and with medium/heavy models rotation friction is negligible. Put your model up there, find your balance and then off. Not a lot of wear. Besides, 6061 is pretty tough aluminum.

    • ARUP
      ARUP commented
      Editing a comment
      Your balance stand is nice! It look as if a strutted wing would fit, too! I bought one of those pricey German made stands and can't use it with the vintage birds, : (

    • edfmaniac
      edfmaniac commented
      Editing a comment
      Very nice work.

  • #62
    31 is very close to being done now. I started off finishing off the wiring and harnesses for the fuse. Got everything situated, then trimmed and installed the cockpit tub, fits perfectly over my radio setup! I had some of the velvet left over from one of my 20's that never got a cockpit, so I used that to dress up the tub a bit.

    Then it was time to finally put the wings on! This is about as big a sailplane as I can fit in my shop. Got all the control surfaces, flight modes and throws set up. Still have some setup to do with the AS3000, but the radio is basically ready now.

    Got the vinyl done on the fuse. I learned to fly full size sailplanes at Harris Hill. so I'm basing the N number and contest number on "If HHSC had a 31". The dark blue really looks good with the orange! Bottom of the wings still to go and need to get something to cover up the painted on German flag.

    While it was all assembled I got it up on the balance stand. Used lead in the cockpit tub to simulate the Tailored Pilot that is on order. It took 28oz to balance at 75mm, which is in the middle of the suggested range. I put 20 oz of lead shot mixed with epoxy into the nose and will keep the other 8 as removable to dial it in.

    So close to finished... too bad its -5 outside!


    Last edited by Sinkhappens86; 01-31-2019, 02:08 AM.
    Kevin K

    Kremer Aerotowing Team

    Comment


    • #63
      Very nice Kevin. Looks great!
      Gunny
      Aviation Concepts rc

      Comment


      • ARUP
        ARUP commented
        Editing a comment
        Looks like Kevin had so much fun getting his 31 together that I'll just have to trade my yet to be started one for his so he can have fun all over again! Merry Christmas... early!

    • #64
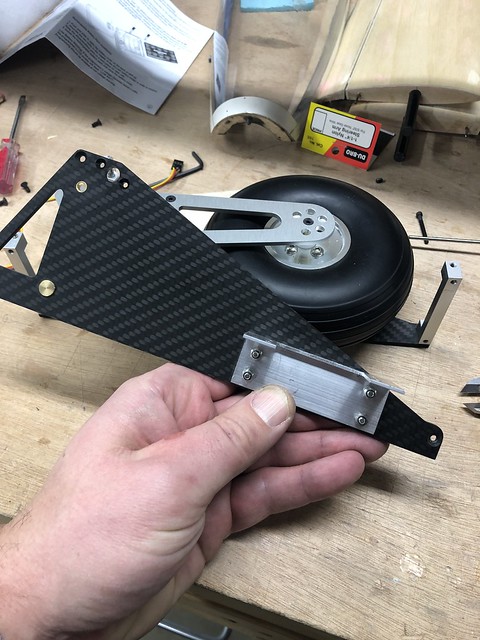
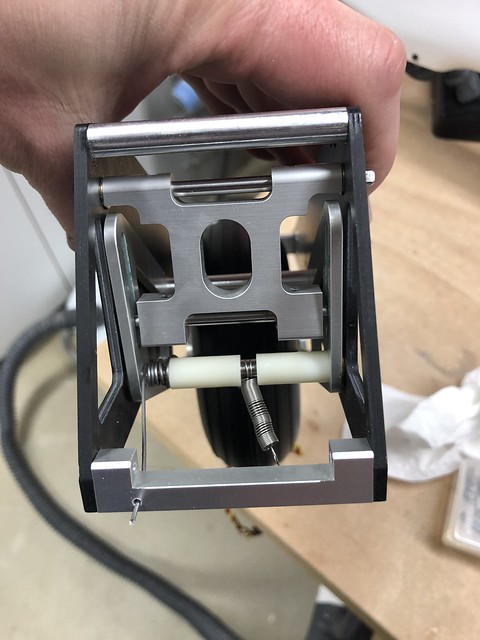
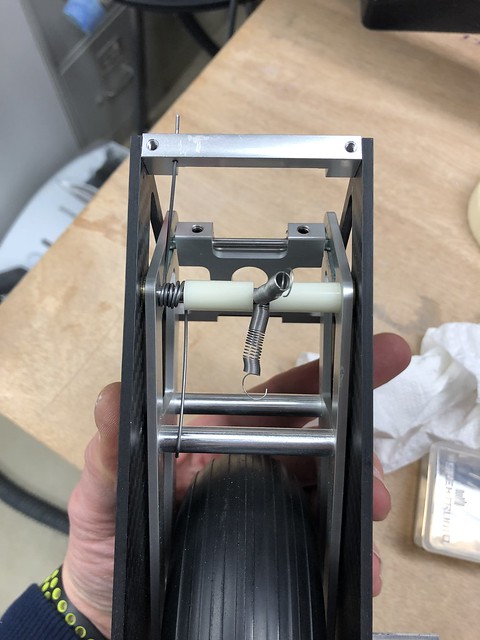
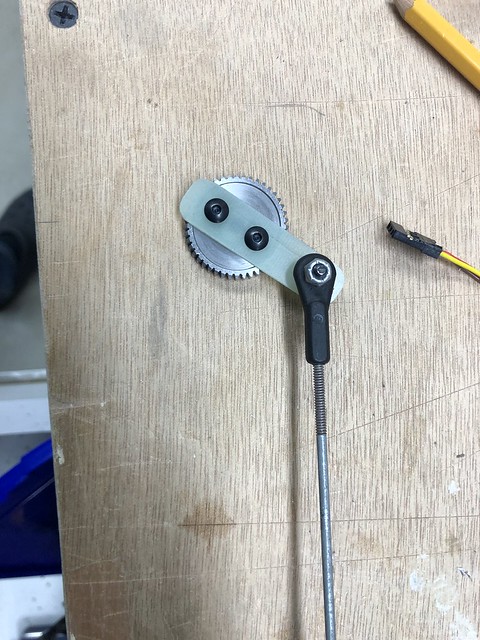
      Here is my mods on the electric LG

      Just in case you would flip the wrong switch at the wrong time and destroy the electrical mechanism. Here is my way to convert the electric landing gear that has a great mechanism to a servo operated LG.
      I used a 1x1in aluminum angle, a programmable servo and 0.04 music wire for the spring.


      Sans titre by steffruelle, sur Flickr


      Sans titre by steffruelle, sur Flickr

      Sans titre by steffruelle, sur Flickr

      Sans titre by steffruelle, sur Flickr

      Sans titre by steffruelle, sur Flickr

      Sans titre by steffruelle, sur Flickr

      Stéphane
      Horizon Hobby Team Member

      Comment


      • #65
        Nice Stephane
        Will probably do the same on Michael's!

        Jeremy
        SCCAAA TT TN

        Comment


        • #66
          Nice Stephane,
          Looks like the one we made in Windy Ridge. Works really well.
          Len Buffinton
          Team Horizon Hobby

          Comment


          • French1
            French1 commented
            Editing a comment
            I took inspiration on your work with Scott, that was a great filed repair that allowed me to fly the entire season

        • #67
          Stephane, where did you get the "G10 Arm"?

          Comment


          • French1
            French1 commented
            Editing a comment
            I made it myself from a G10 plate I bought online, cut it with a hacksaw and sanded it, then press drilled it, and tapped the gear for 4-40 screws.

            Another avenue is to use a boat rudder arm, metal of course as I tried with plastic and doesn't work...

            BTW the axle of the arm is a 3mm one

        • #68
          Stephane, thank you for the info. I now have another question. I bought a 180 degree servo and I can get it to move 180 on the servo tester in extended mode. Yet when I plug it into the receiver and try to move it with the TX, I only get 60 degrees of movement. The travel is set to 150%. Any idea of what I should do?

          Comment


          • French1
            French1 commented
            Editing a comment
            if you have +150 -150 it means that the servo is not programmed or that the programming has not been saved
            What is the servo you are using?

        • #69
          The servo is a robotic servo, it's a Hobbypark digital 180. I called Horizon about my iX12 to see if there was something I could do different. But doesn't look that way. I just purchased the "Servo Stretcher". It makes any servo swing 180 degrees.

          Comment


          • #70
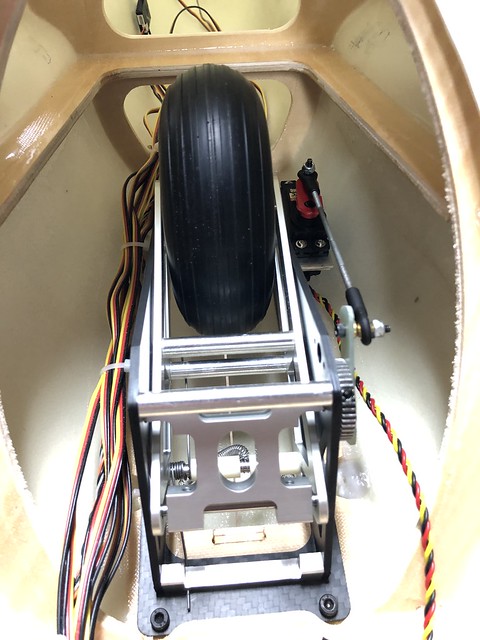
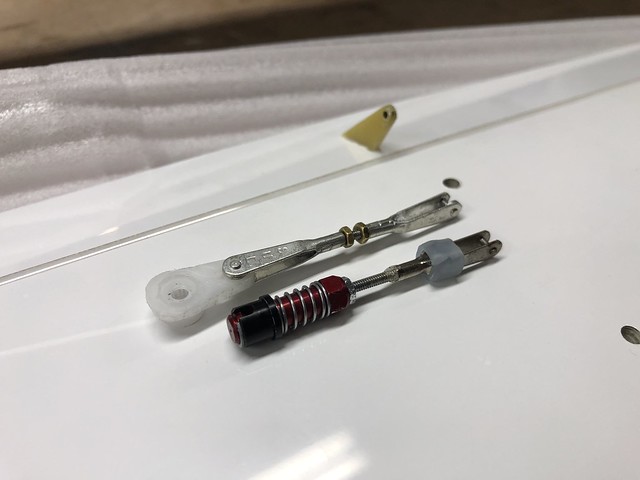
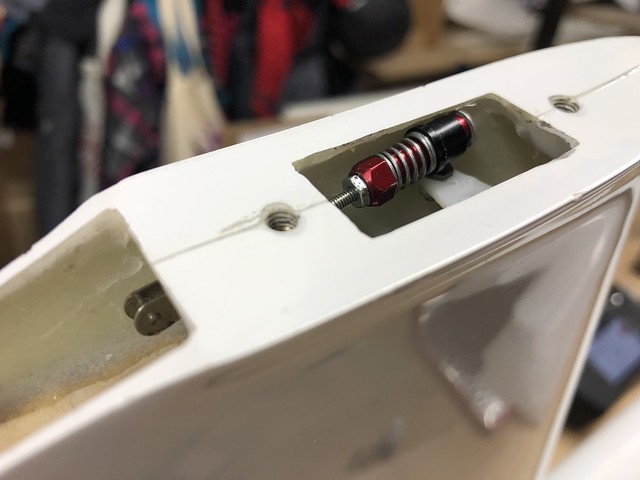
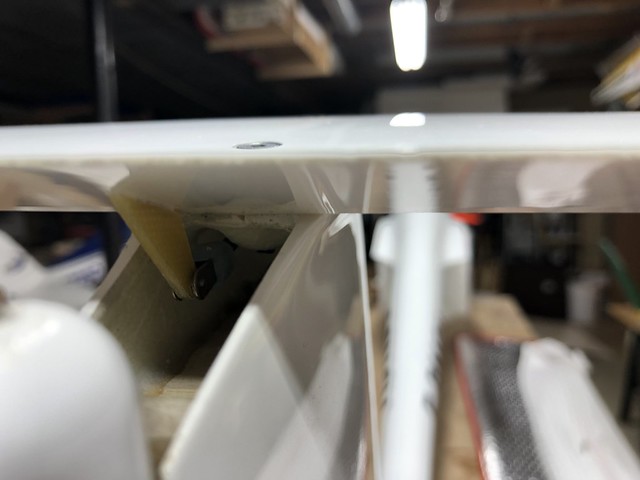
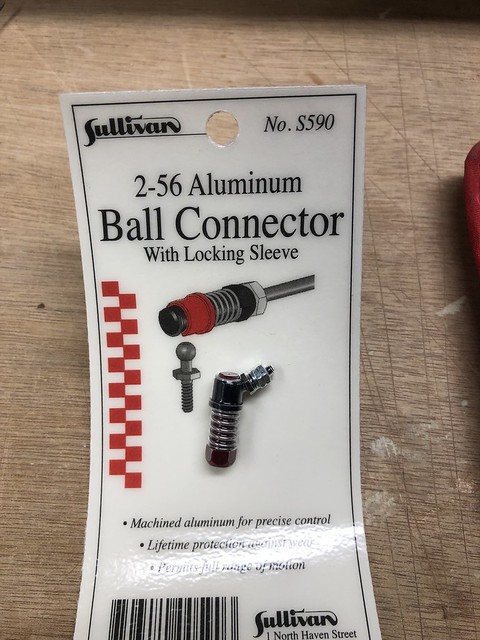
            As I am waiting the snow to melt, I changed the elevator connection to use a Sullivan Ball connector, and it is much easier to connect the stab to the servo. Clearance is just what is needed...

            Stock linkage vs mods

            Sans titre by steffruelle, sur Flickr

            Just enough room...

            Sans titre by steffruelle, sur Flickr

            Introduction of the linkage from the rear

            Sans titre by steffruelle, sur Flickr

            With the angle, no problem for the linkage room

            Sans titre by steffruelle, sur Flickr

            The magic no slop linkage

            Sans titre by steffruelle, sur Flickr
            Stéphane
            Horizon Hobby Team Member

            Comment


            • #71
              CG smack dab in the middle of the 60-85mm marks. Landing gear waiting on Fedx to arrive with linkage. Then it will be ready to maiden.

              Comment


              • #72
                After a few flights on either wet or somewhat freshly mowed grass I found way too much spray and stuff not only on the inside of the fuselage but it made an awful mess on the inside of the canopy as well.

                I started to make a vacuum form mold for a slip over of the entire gear like I did for the ASW20 like the one shown here:
                Click image for larger version

Name:	H9_ASW20_GearFender_01.jpg
Views:	416
Size:	182.0 KB
ID:	35237

                Here's the start for the ASH 31:

                Click image for larger version

Name:	H9_ASH31_GearFender_01.jpg
Views:	425
Size:	118.6 KB
ID:	35238
                But I was afraid on wet grass the moisture would collect around the gear motor and who knows...

                So, I made a foam fender plug and after thinking sometime on how it would attach to the gear, glassed and waxed... spacer rods on the ASH31 gear are 5/16" diameter so I sliced a brass tube that had 5/16" ID for plug attachment points.
                Click image for larger version

Name:	H9_ASH31_GearFender_02.jpg
Views:	378
Size:	139.9 KB
ID:	35239

                Built a box around it and filled with some old MPK 1125 silicone mold material I had laying around. Should have mixed it better as the silicone had settled really bad and left soft spots in the final mold. Stuffs a bit expensive otherwise would have bought more and made a new mold. Anyway...

                Click image for larger version

Name:	H9_ASH31_GearFender_03.jpg
Views:	404
Size:	125.5 KB
ID:	35240
                Click image for larger version

Name:	H9_ASH31_GearFender_04.jpg
Views:	393
Size:	106.2 KB
ID:	35241

                Click image for larger version

Name:	H9_ASH31_GearFender_05.jpg
Views:	378
Size:	88.0 KB
ID:	35242

                Click image for larger version

Name:	H9_ASH31_GearFender_06.jpg
Views:	418
Size:	64.4 KB
ID:	35243

                The mold was half decent so applied a layer of gel coat then laid up a few layers of 6oz. glass.

                Click image for larger version

Name:	H9_ASH31_GearFender_07.jpg
Views:	424
Size:	138.1 KB
ID:	35244

                The soft spots in the mold left a couple of bumps and imperfections on the final product but they were easily sanded smooth. I tinted the gel coat for a gray color. The good part was the attachment area turned out perfect with sharp, accurate reproduction..

                Click image for larger version

Name:	H9_ASH31_GearFender_08.jpg
Views:	387
Size:	108.9 KB
ID:	35245

                I epoxied a small piece of aluminum on the inside as a nut backing plate.

                Click image for larger version

Name:	H9_ASH31_GearFender_09.jpg
Views:	411
Size:	124.8 KB
ID:	35246


                Comment


                • #73
                  Test fit...perfect!

                  Click image for larger version

Name:	H9_ASH31_GearFender_010.jpg
Views:	373
Size:	92.8 KB
ID:	35248

                  Aluminum attachment plate with 6-32 hardware.

                  Click image for larger version

Name:	H9_ASH31_GearFender_012.jpg
Views:	403
Size:	145.3 KB
ID:	35249

                  Click image for larger version

Name:	H9_ASH31_GearFender_011.jpg
Views:	401
Size:	123.9 KB
ID:	35250

                  Click image for larger version

Name:	H9_ASH31_GearFender_013.jpg
Views:	389
Size:	97.8 KB
ID:	35251
                  Click image for larger version

Name:	H9_ASH31_GearFender_014.jpg
Views:	393
Size:	96.2 KB
ID:	35252

                  Fits perfect with good clearance all around. Hope it works!

                  Click image for larger version

Name:	H9_ASH31_GearFender_015.jpg
Views:	406
Size:	99.1 KB
ID:	35253
                  Click image for larger version

Name:	H9_ASH31_GearFender_016.jpg
Views:	392
Size:	96.5 KB
ID:	35254
                  Click image for larger version

Name:	H9_ASH31_GearFender_017.jpg
Views:	344
Size:	115.2 KB
ID:	35255

                  Comment


                  • BurtPR
                    BurtPR commented
                    Editing a comment
                    Hey! Since Bryan has a mold he could make a mint selling these things to his close friends. Can I be Bryan's friend? Or it that a Facebook thing.

                • #74
                  Very Nice addition Bryan
                  Stéphane
                  Horizon Hobby Team Member

                  Comment


                  • ARUP
                    ARUP commented
                    Editing a comment
                    +1 That's pretty neat!

                  • Mark9
                    Mark9 commented
                    Editing a comment
                    Yep, very nice work.

                • #75
                  Anybody know what the latest ETA is on replacement wing bags from Horizon?
                  Thanks

                  Comment

                  Working...
                  X